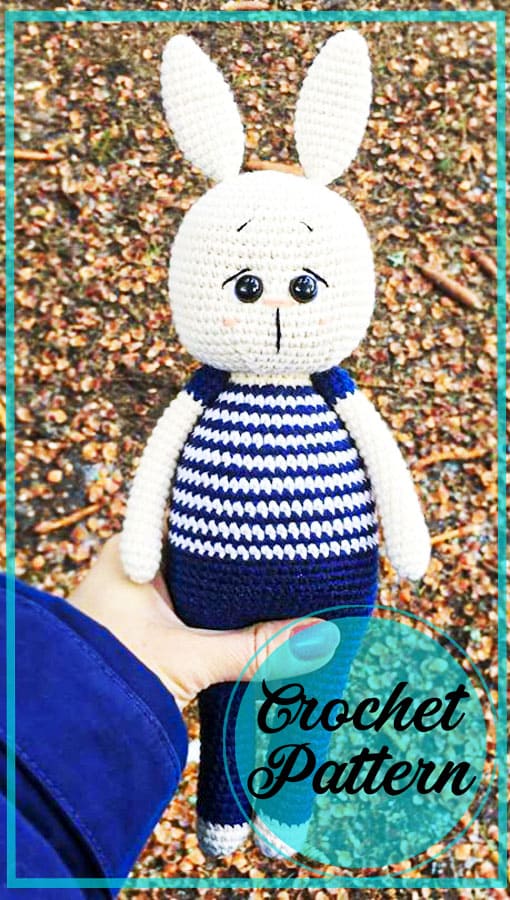
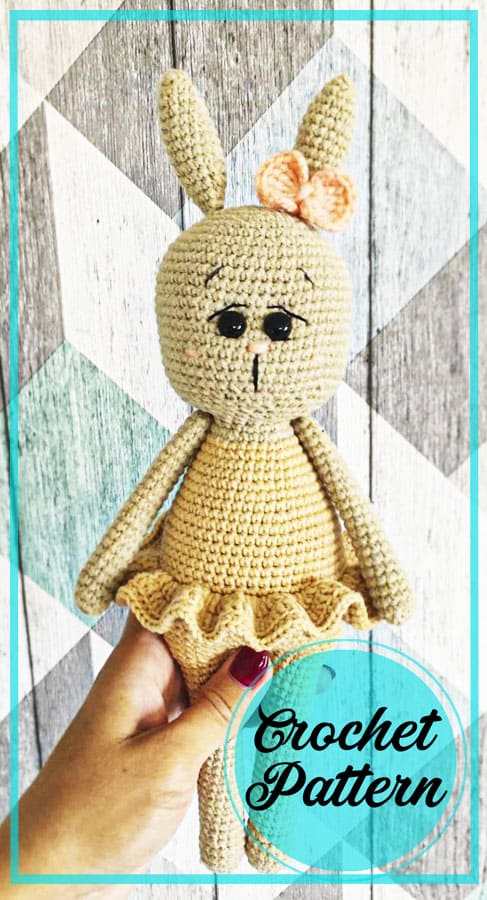
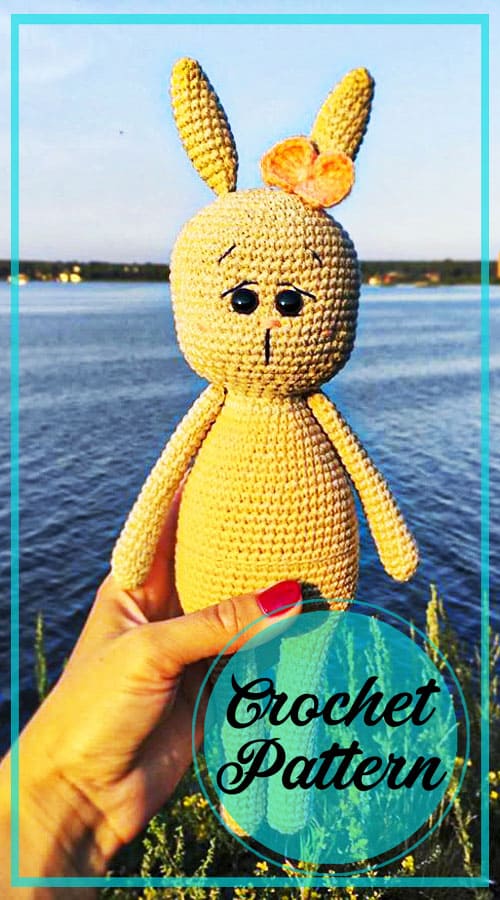
Friends, we continue from where we left our adorable amigurumi bunny series. You can see today’s model in the pictures. First of all, thank you very much to the designer @korzina_katerina. she has a very nice share. She also has very nice posts on his Instagram page. You can follow.
Friends I know, bunny amigurumi is in high demand. I try to share bunny models as much as I can. As you know, all of these patterns are free. Of course I am not doing these. We share designers who like to share, and we organize them and collect them in one place. In order to reach more people.
In this way, the art of amigurumi develops. This bunny model is similar to a model that is highly sought after. Soft rope is generally preferred in Amigurumi rabbit models. Upon completion, it becomes a plush amigurumi. You can look at the posts I’ve made before. This model is a little different.
In order to be an idea for you, I shared pictures of models knitted in different shapes and colors. You can also see other photos by switching between Safyas. I hope you like. Love to all of you friends.
We offer to knit a toy bunny amigurumi according to the author’s description from @korzina_katerina. According to this scheme, you can make both a bunny boy and a bunny girl. For the manufacture of toys it is better to use cotton or acrylic yarn.
Instagram: @korzina_katerina
Materials and tools:
YarnArt Jeans yarn (3 colors)
Hook 2.0 mm
8 mm eyes on safety mount
Mouline thread for face embroidery
Filler
Abbreviations
sc : Single Crochet
inc : Increase
dec : Decrease
tr : Triple Crochet/ Treble Crochet
st: Stitch
dc : Double Crochet
hdc: Half Double Crochet
sl-st : Slip Stitch
ch : Chain
..in : make increase into same stitch as many as the number which is given in front of “inc” abbreviation (exp; 3inc, 4inc..).
FLO : Crochet into front loops only
BLO : Crochet into back loops only
BL : Bobble Stitch – do 5dc all in the same stitch and then yarn over and pull through all the loops on your hook (the original loop + 1 loop for each partially completed dc).


Ears (2 times)
1) 6 sc in MR (6)
2) (inc, 2 sc)*2 (8)
3) (inc, 3 sc)*2 (10)
4) (inc, 4 sc)*2 (12)
5) (inc, 5 sc)*2 (14)
6) (inc, 6 sc)*2 (16)
7-11) 16 sc (16)
12) (dec, 6 sc)*2 (14)
13) (dec, 5 sc)*2 (12)
14) (dec, 4 sc)*2 (10)
15) (dec, 3 sc)*2 (8)
Do not close the part, do not stuff the ears.
Head / torso / legs
The change in yarn colors in the description is for a bunny boy.
If you knit a girl bunny, then when knitting the torso, you need to knit the 45th and 47th rows behind the back wall of the loops 50 sc.
We start knitting from the head:
1) 6 sc in MR (6)
2) 6 inc (12)
3) (inc, 1 sc)*6 (18)
4) (inc, 2 sc)*6 (24)
5) (knit the ear over the three walls together 4 sc, then inc, 3 sc, inc, 2 sc, inc)*2 (30)
6) (inc, 4 sc)*6 (36)
7) (inc, 5 sc)*6 (42)
8) (inc, 6 sc) *6 (48)
9) (inc, 7 sc)* 6 (54)
10-20) 54 sc
21) (dec, 7 sc)*6 (48)
22) (dec, 6 sc)*6 (42)
23) (dec, 5 sc)*6 (36)
24) (dec, 4 sc)*6 (30)
25) (dec, 3 sc)*6 (24)
26) (dec, 2 sc)*6 (18)
27)18 sc (18) — neck
28) (inc, 2 sc)*6 (24)
Color change.
We start with blue and until the 44th row we alternate strips of white and blue, from the 45th row we go to blue.
29) (inc, 3 sc)*6 (30)
30) 30 sc (30)
31) (inc, 4 sc)*6 (36)
32) 36 sc (36)
33) (inc, 5 sc)*6 (42)
34) 42 sc (42)
35) (inc, 6 sc)*6 (48)
36) 48 sc (48)
37) 18 sc, inc, 7 sc, inc, 21 sc (50)
38-51) 50 sc (50)
52) 21 sc, dec, 7 sc, dec, 18 sc (48)
53) (dec, 6 sc)*6 (42)
We stuff the head and body.
54) 41 sc
Next, we will divide the knitting into two parts to tie the legs. We count to the right of the hook 16 sc and knit the 42nd and 17th posts from the hook together.
Work 4 sc more on both sides of the body (close the space between the legs).
We do not cut the thread, we continue to knit – the right leg:
1) Knit 16 sc in a circle, knit the 17th sc from the loop that connects the two walls of the body (17)
2-20) 17 sc (17)
Change color to head color:
21-23) 17 sc (17)
24) (1 sc, dec)*6, then 6 dec
Stuff the leg as we knit, close it with a needle.
Now attach the blue thread to the first sc in the hole for the second leg.
We knit the left leg according to the pattern of the right.
Upper legs (2 pcs.)
Let’s start with the color of the head:
1) 6 sc in MR (6)
2)1 sc, 5 inc (11)
3-19) 11 sc (11)
Change color to blue:
20-22) 11 sc (11)
23) 5 dec, sl st
We fill in as we knit, close the part with a needle.
It remains to decorate the toy: sew on the upper paws, eyes, embroider the muzzle.
Skirt
We return to the 45th and 47th rows of the body, which were knitted by the back walls of the posts.
It is best to knit the skirt when the toy is ready.
I connect the rows with sl st and make 2 lifting loops.
Layer 1: attach the thread to the 45th row of the body, knit by the front walls of the posts.
1) 50 inc dc, those. knit into each front wall of the loop on the body 2dc (100)
2) (inc, 1 dc)*50 (150)
Cut the yarn, carefully take it into the body.
2nd layer: we attach the thread to the 47th row of the body, we knit by the front walls of the columns.
1) 50 inc dc, i.e. in each front wall of the loop on the body we knit 2 dc (100)
2) (inc, 2 dc) * 33, inc (134)
3) 134 dc (134)
Cut the thread, carefully take it into the body.
Amigurumi Bunny PDF Crochet Free Pattern is a delightful and easy-to-follow pattern for creating adorable bunnies through the art of amigurumi. This pattern is perfect for both beginners and experienced crocheters who are looking to create a charming and huggable bunny. The pattern includes detailed instructions and step-by-step photos that guide you through the process of creating a cute and cuddly bunny. You can customize the size and color of your bunny to make it unique and special. With this free pattern, you can create a lovely handmade gift for loved ones or simply enjoy the satisfaction of making something with your own hands. So, grab your crochet hook and yarn and get ready to embark on a fun and rewarding amigurumi bunny-making journey!


Comments0