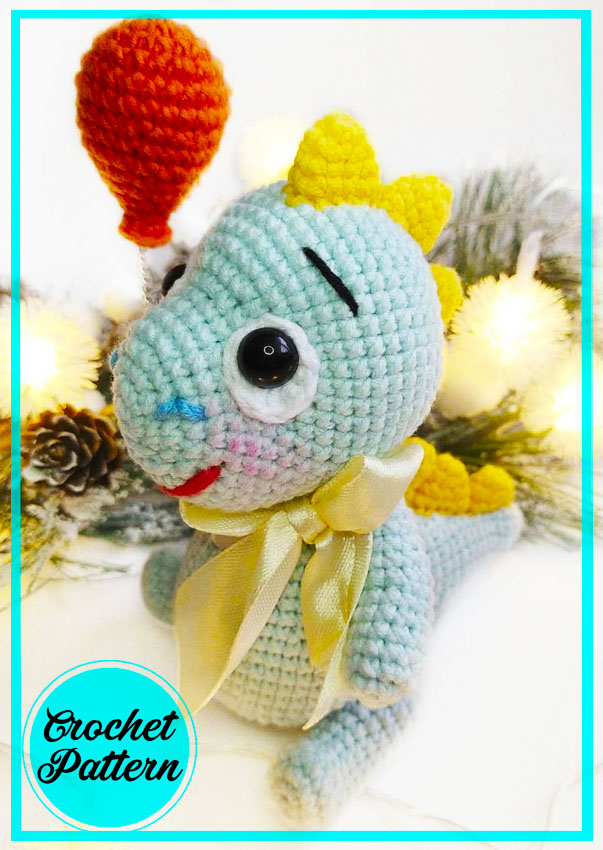
Would you like to embroider a very cute dinosaur amigurumi with crochet? It can make a really great gift for babies and toddlers. The use of particularly striking colors makes the crochet dinosaur look very cute. In this way, your child can easily turn his attention to the dinosaur. The use of green color may seem a little strange, but I think it was the right choice as it blends well with other colors. Now let’s crochet the amigurumi dinosaur.
Dear needlewomen!
This Dinosaur pattern is intended for personal use only at no cost! Selling this master class in any language is strictly FORBIDDEN !!!
The toys associated with this description can be disposed of at your own discretion! When publishing photos of finished works, mentioning the author of the Dinosaur pattern is welcome!
Designer: @emusatskova_toys
Materials required:
1. Alize cotton gold blue (main), yellow and white
(quite a few) colors, orange for the balloon
2. Filler
3. Hook (I have No. 1.6)
4. Stitching needle
5. Black half beads 2 pcs.
6. Aluminum wire about 15 cm (for a ball)
7. Satin ribbon 25mm wide – 20 cm
8. Dry pastel for toning
Abbreviations
AR – Amigurumi Magic ring
MR – Amigurumi Magic ring
App – application
ll – lift loop
sc : Single Crochet
inc : Increase
dec : Decrease
tr : Triple Crochet/ Treble Crochet
st: Stitch
dc : Double Crochet
hdc: Half Double Crochet
sl-st : Slip Stitch
ch : Chain
..in : make increase into same stitch as many as the number which is given in front of “inc” abbreviation (exp; 3inc, 4inc..).
FLO : Crochet into front loops only
BLO : Crochet into back loops only
BL : Bobble Stitch – do 5dc all in the same stitch and then yarn over and pull through all the loops on your hook (the original loop + 1 loop for each partially completed dc).
Hands
1 P: 6 sc in MR
2 P: 6 inc (12)
3 – 7 P: 12 sc (5 rows)
8 P: 5 sc behind the back loop, 7 sc (12)
9 P: 5 sc behind the front loops of the previous row, 7 sc (12)
10 – 13 P: 12 sc (4 row)
14 P: 6 dec.
Legs
1 P: 5 ch, from the 2nd loop from the hook 3sc, 3 sc in one loop, then knit along the other side of the chain: 2 sc, inc (10)
2 P: inc, 2 sc, 3 inc, 2 sc, 2 inc (16)
3 P: 16 sc
4 P: 4 sc, 4 dec, 4 sc (12)
5 – 7 P: 12 sc (3 row)
8 P: inc, 5 sc, inc, 5 sc (14)
9 P: 14 sc
10 P: inc, 6 sc, inc, 6 sc (16)
11- 12 P: 16 sc
13 P: (2 sc, dec)*4 (12)
14 P: 6 dec
Body
1 P: 6 sc in MR
2 P: 6 inc (12)
3 P: (sc, inc)*6 (18)
4 P: (inc, 2 sc)*6 (24)
5 P: (3 sc, inc)*6 (30)
6 P: (2 sc, inc, 2 sc)*6 (36)
7 P: (5 sc, inc)*6 (42)
8 P: (3 sc, inc, 3 sc)*6 (48)
9 P: (7 sc, inc)*6 (54)
10 – 12 P: 54 sc
13 P: (7 sc, dec)*6 (48)
14 P: 48 sc
15 P: (3 sc, dec, 3 sc)*6 (42)
16 P: 42 sc
17 P: (5 sc, dec)*6 (36)
18 P:36 sc
19 P: (2 sc, dec, 2 sc)*6 (30)
20 P: 30 sc
21 P: (3 sc, dec)*6 (24)
22 P: 24 sc
23 P: (sc, dec, sc)*6 (18)
24-25 P: 18 sc. Fasten the yarn, cut. Stuff the torso.
Tail
1 P: 6 sc in MR
2 P: (2 sc, inc)*2 (8)
3 P: 8 sc
4 P: (3 sc, inc)*2 (10)
5 P: (4 sc, inc)*2 (12)
6 P: (5 sc, inc)*2 (14)
7 P: (6 sc, inc)*2 (16)
8 P: (7 sc, inc)*2 (18)
9 P: (8 sc, inc)*2 (20)
10 P: 9 sc, inc, 10 sc
11 P: 10 sc, inc, 10 sc
12 P: 10 sc, inc, 11 sc
13 P: 11 sc, inc, 11 sc
Fasten the yarn, cut. Fill. Sew on to the body.
Head
1 P: 6 sc in MR
2 P: 6 inc (12)
3 P: (sc, inc)*6 (18)
4 P: (inc, 2 sc)*6 (24)
5 P: (3 sc, inc)*6 (30)
6 – 8 P: 30 sc (3 row)
9 P: (sc, inc)*6, 18 sc (36)
10 P: (inc, 2 sc)*6, 18 sc (42)
11 P: (3 sc, inc, 3 sc)*6 (48)
12 – 18 P: 48 sc (7 rows)
19 P: (3 sc, dec, 3 sc)*6 (42)
20 P: 42 sc
21 P: (5 sc, dec)*6 (36)
22 P: (2 sc, dec, 2 sc)*6 (30)
23 P: (3 sc, dec)*6 (24)
24 P: (sc, dec, sc)*6 (18)
25 P: (sc, dec)*6 (12)
26 P: 6 dec. Fasten the yarn, cut, pull the hole. Make a tightening of the eye sockets. Sew on to the body.
Whites of the eyes
1 P: 6 sc in MR
2 P: 2 sc, (hdc, dc) in one loop, inc dc, (dc, hdc) in one loop, inc, slst.
Sew on. Glue a half decine. Or tie the pupil in black: 1. 6 sc in MR, slst.
Large combs (5 times)
1 P: 6 sc in MR
2 P: (2 sc, inc)*2
3 P: (3 sc, inc)*2
4 P: (4 sc, inc)*2. We sew combs on the head, back and tail, except for the very tip.
Small combs (1 times)
1 P: 6 sc in MR
2 P: (2 sc, inc)*2
3 P: (3 sc, inc)*2. Sew on the tip of the tail.
Using the yarn fastening, we install the handles and legs.
Ball
1 P: 6 sc in MR
2 P: 6 inc (12)
3 P: (sc, inc)*6 (18)
4 P: (inc, 2 sc)*6 (24)
5 -6 P: 24 sc
7 P: (2 sc, dec)*6
8 – 9 P: 18 sc
10 P: (sc, dec)*6
11 P: 12 sc
Fold the wire in half, leave a small ring so that you can put it on the dinosaur handle. We twist. We insert into the ball, having previously wrapped the ends with adhesive plaster.
12P: 6 dec
13 P: (sc, inc)*3. Fasten the yarn, cut.
This is a free crochet pattern for creating a cute and cuddly baby dinosaur in the amigurumi style. Amigurumi is a Japanese art of knitting or crocheting small, stuffed animals with precise and tight stitches to give them a soft and realistic appearance. This pattern is perfect for those who are new to amigurumi as it is easy to follow and requires only basic crochet skills. The finished baby dinosaur will be about 6-8 inches tall and can be made in various colors to suit your preference. It makes a great gift for children or a unique addition to your own collection. Download the free PDF pattern and get ready to embark on a fun and rewarding crocheting journey!


Comments0