Today I am sharing two teddy bear amigurumi patterns. The second amigurumi pattern is a slightly larger one. The size of the teddy bears is very important. Crocheting large bears may seem like a waste of time for you. However, if you want to master amigurumi crochet, you should start to crochet large amigurumi. Teddy bears are usually simple amigurumi patterns. It will also make your job easier by explaining how to crochet the pattern step by step. You can crochet this beautiful teddy bear by following the steps.
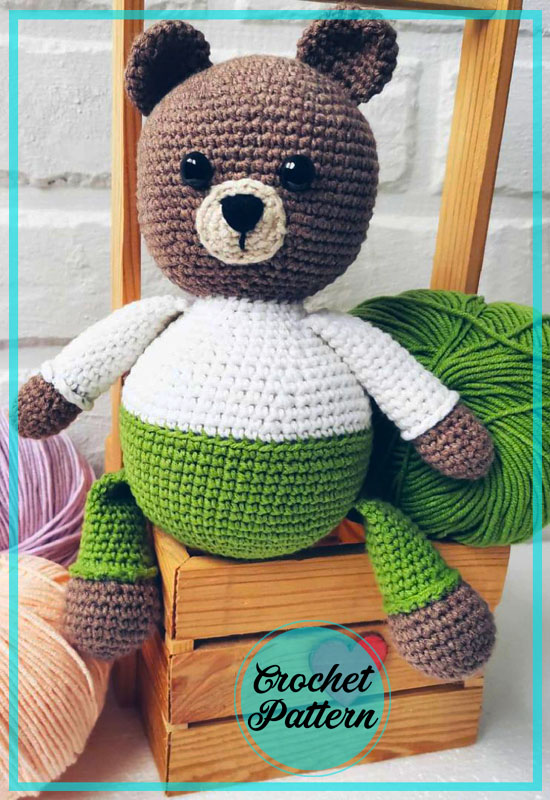
Amigurumi bear in pants and a blouse from Marina Yakubova is crocheted from cotton yarn. The arms and legs are tied into the body, and the head, ears and muzzle are sewn on. The clothes are not removed, they are knitted together with the details of the toy by changing the thread. The size of the finished crochet bear is 20 cm when using the recommended materials.
Designer: nitka.boom
Necessary materials:
YarnArt Jeans yarn in green, white, brown, beige colors
Hook 2.0 mm
10 mm eyes on safety mount
Some black thread for embroidering a muzzle
Filler
Abbreviations
AR – Amigurumi Magic ring
MR – Amigurumi Magic ring
App – application
ll – lift loop
sc : Single Crochet
inc : Increase
dec : Decrease
tr : Triple Crochet/ Treble Crochet
st: Stitch
dc : Double Crochet
hdc: Half Double Crochet
sl-st : Slip Stitch
ch : Chain
..in : make increase into same stitch as many as the number which is given in front of “inc” abbreviation (exp; 3inc, 4inc..).
FLO : Crochet into front loops only
BLO : Crochet into back loops only
BL : Bobble Stitch – do 5dc all in the same stitch and then yarn over and pull through all the loops on your hook (the original loop + 1 loop for each partially completed dc).

Ears (2 parts)
1 RND: 6 sc in MR (6)
2 RND: inc×6 (12)
3 RND: (1 sc, inc)×6 (18)
4-6 RND: 18 sc (3 rows)
7 RND: (1 sc, dec) ×6 (12)
Fold the edges together and knit 6 sc on both edges.
We fasten the thread, cut it, leaving a little for sewing.
Legs (2 parts)
We fill the legs a little more than half.
We start knitting with the color of the bear’s body.
1 RND: 6 sc in MR (6)
2 RND: inc×6 (12)
3 RND: (1 sc, inc)×6 (18)
4 RND: (2 sc, inc)×6 (24)
5-8 RND: 24 sc (4 rows)
9 RND: (2 sc, dec) ×6 (18)
10 RND: Change the thread to the color of the pants and knit 18 sc behind the back of the loop.
11 RND: (4 sc, dec)×3 (15)
12-20 RND: 15 sc (9 rows)
Fold the edges together and knit 7 sc on both edges.
We fix the thread, cut it off.
We tie the bottom of the panties.
To do this, you need to attach a thread in the color of the pants to the 10th row and knit behind the front wall of the loop 18 sc.
Arms (2 parts)
We fill the handles a little more than half.
We start knitting with the color of the bear’s body.
1 RND: 6 sc in MR (6)
2 RND: inc×6 (12)
3 RND: (3 sc,inc)×3 (15)
4-6 RND: 15 sc (3 rows)
7 RND: (3 sc,dec)×3 (12)
8 RND: Change the thread to the color of the jacket and knit 12sc on the back of the loop.
9-21 RND: 12 sc (12 rows)
Fold the part with the edges together and knit 6 sb at both edges.
We fix the thread, cut it off.
We tie the bottom of the sleeves.
To do this, attach a sweater-colored thread to row 8 and knit 12sc behind the front wall of the loop.
Muzzle
1 RND: 6 sc in MR (6)
2 RND: inc×6 (12)
3 RND: (1 sc, inc)×6 (18)
4 RND: 18 sc, сс
Fasten the thread, cut off.
Head
1 RND: 6 sc in MR (6)
2 RND: inc×6 (12)
3 RND: (1 sc, inc)×6 (18)
4 RND: (2 sc, inc)×6 (24)
5 RND: (3 sc, inc)×6 (30)
6 RND: (4 sc, inc)×6 (36)
7 RND: (5 sc, inc)×6 (42)
8 RND: (6 sc, inc)×6 (48)
9 RND: (7 sc, inc)×6 (54)
10 RND: (8 sc, inc)×6 (60)
11-21 RND: 60 sc (11 rows)
At the level of 16-17 rows, we insert eyes. The distance between the eyes is 4 loops.
22 RND: (8 sc, dec)×6 (54)
23 RND: (7 sc, dec)×6 (48)
24 RND: (6 sc, dec)×6 (42)
25 RND: (5 sc, dec)×6 (36)
26 RND: (4 sc, dec)×6 (30)
27 RND: (3 sc, dec)×6 (24)
We fasten the thread, cut it, leaving a little for sewing.
Body
We start knitting with the color of the pants.
1 RND: 6 sc in MR (6)
2 RND: inc×6 (12)
3 RND: (1 sc, inc)×6 (18)
4 RND: (2 sc, inc)×6 (24)
5 RND: (3 sc, inc)×6 (30)
6 RND: (4 sc, inc)×6 (36)
7 RND: (5 sc, inc)×6 (42)
8 RND: (6 sc, inc)×6 (48)
9 RND: (7 sc, inc)×6 (54)
10 RND: (8 sc, inc)×6 (60)
11-19 RND: 60 sc (9 rows). In the 13th row we knit the legs. Knit 12 sc, 7 sc with leg, 24 sc, 7 sc with leg, 10 sc.
20 RND: Change the color of the thread to the color of the jacket and knit at the back of the loop 60 sc.
21 RND: (8 sc, dec)×6 (54)
22 RND: 54 sc
23 RND: (7sc, dec)×6 (48)
24 RND: 48 sc
25 RND: (6 sc, dec)×6 (42)
26 RND: 42 sc
27 RND: (5 sc, dec)×6 (36)
28 RND: 36 sc
29 RND: (4 sc, dec) ×6 (30)
30 RND: In this row we will knit handles: 8 sc, 6 sc together with the handle, 10 sc, 6 sc together with the hand (30)
31 RND: (3 sc, dec)×6 (24)
32 RND: 24 sc
We fix the thread, cut it off.
Assembling the toy
Sew the ears and muzzle to the head. We embroider a nose on the face.
Sew the head to the calf.
Barney the Bear Amigurumi is a delightful and free crochet pattern available in PDF format. This adorable amigurumi bear is perfect for crafters of all skill levels, from beginners to advanced. The pattern includes detailed instructions and step-by-step photos to guide you through the process. With its soft and huggable texture, Barney the Bear makes a wonderful addition to any child’s toy collection or as a cute decoration for your home. Crocheting this charming bear is not only a fun and relaxing hobby but also a great way to create a unique and personalized gift for loved ones. So why wait? Download the free PDF pattern and start creating your own Barney the Bear Amigurumi today!


Comments0