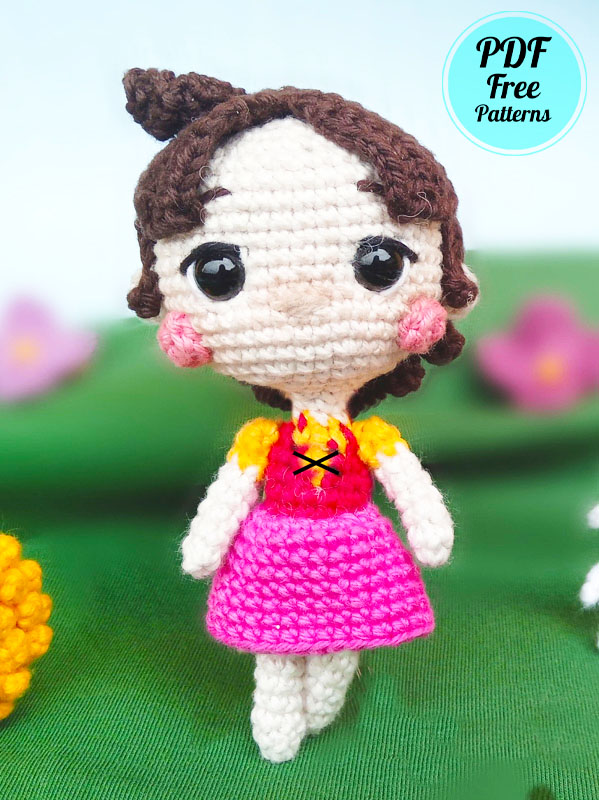
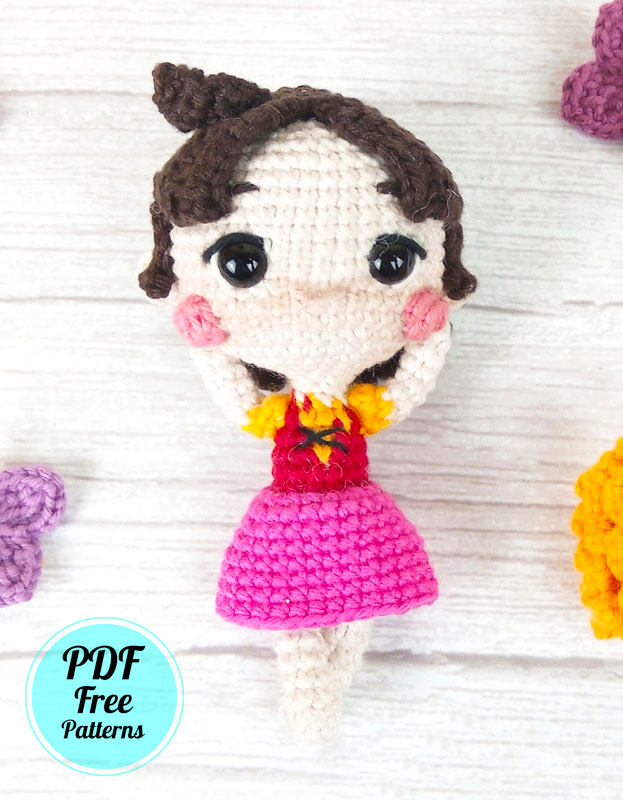
Hello my dears. Today, I will share a cartoon character amigurumi free pattern that almost everyone knows very well. Today’s crochet pattern is Heidi. You can find the adventures of Heidi, a little girl living in the Austrian Alps, with her grandfather, and her friend in the cartoon. So how about making a magnificent heidi amigurumi? Even though the crochet doll heidi amigurumi pattern is a little detailed, its construction will not force you. However, I can say that it is still at a advanced level.
Designer: Silvia francucci
LEGS x2
R1. 6sc in MR (6)
R2-9. 6sc (6)
sl st and fo.
Make a second leg but don’t fo and keep working.
Legs don’t need to be stuffed If you want to add underwaer change color to white from R10 to R13.
BODY
Stuff as you go
R10. 3sc, ch2, join the other leg with a sc, 5sc, 2sc on the ch, 3sc (16)
R11-13. 16sc (16)
change color to red
R14. 16sc (16)
R15. all BLO, (dec, 6sc) x2 (14)
R16. 14sc (14)
Start stuffing and keep on as you go
When you reach the neck stuff it firmly so that the head won’t move too much.
In the next 3 rounds we change color to yellow. When you have to change the sc will be colored.
R17-18. 3sc, sc, 10sc (14)
R19. (dec, 3sc, dec) x2 (10)
Change to skin color
R20. (dec, sc, dec) x2 (6)
R21. 6sc (6)
R22. 6inc (12)
R23. (sc, inc) x6 (18)
R24. (sc, inc, sc) x6 (24)
R25. (3sc, inc) x6 (30)
R26. (2sc, inc, 2sc) x6 (36)
R27. 5sc, inc) x6 (42)
R28-29. 42sc (42)
In R30 and R34 the dec and inc have to be made in the front of the doll, right below the eyes (see red mark in the pic below).
Depending on the way you work and yarn you use they might fall in the wrong place if you follow my pattern, so adjust them depending on where you end up having your first st.
R30. 10sc, dec, 6sc, dec, 22sc (40)
R31-33. 40sc (40)

R34. 10sc, inc, 6sc, inc, 22sc (42) R35-37. 42sc (42)
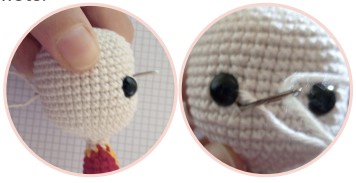
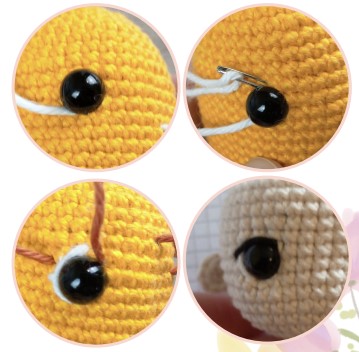
Stop to place safety eyes between
R31-32, 7 sts apart
Start stuffing and keep on doing it as you go
R38. (5sc, dec) x6 (36)
R39. (2sc, dec, 2sc) x6 (30)
R40. (3sc, dec) x6 (24)
R41. (sc, dec, sc) x6 (18)
R42. (sc, dec) x6 (12)
R43. 6dec (6)
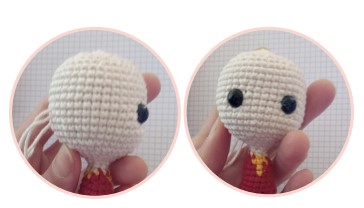
Fo and close the litte hole
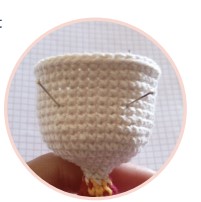
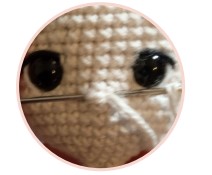
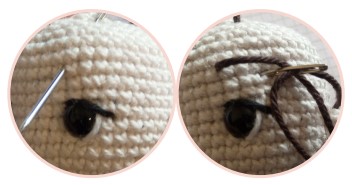
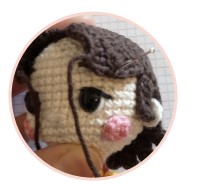
EYE INDENTATION
To do eye indentation cut two strands of yarn long enough to pass through the head twice and put them in the inner part of the eyes as shown in pictures. Pull tight and tie knots.
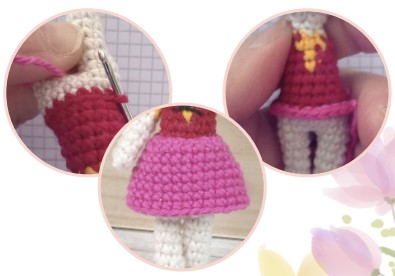
SKIRT
Put the doll upside down and join fuchsia yarn in the FLO left in R15
Join at the side so that the inc end up to the sides of the doll
R1. (inc, 3sc) x4 (20)
R2. (inc, 9sc) x2 (22)
R3. (inc, 10sc) x2 (24)
R4. (inc, 11sc) x2 (26)
R5. (inc, 12sc) x2 (28)
R6-8. 28sc (28)
sl st, inv join and fo
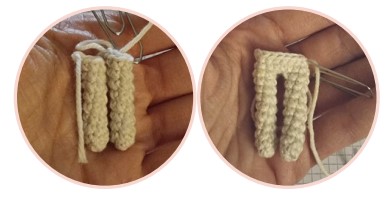
ARMS x2
R1. 5sc in MR (5)
R2-6. 5sc (5)
Change to yellow
R7. 5sc (5) turn your work without doing a turning ch
R8. sk1, 2hdc, sc (3)
Leave the last st unworked
Fo, leave a long end for sewing
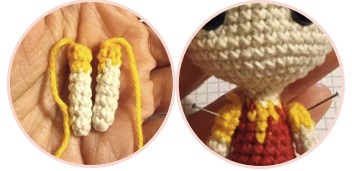
Arms don’t need to be stuffed
Sew the arms on the sides of the doll’s body
EARS x2
6sc in MR (6)
Fo, leave a long end for sewing
Sew them at 6 sts from the eyes. See pics below, 2 sts wide
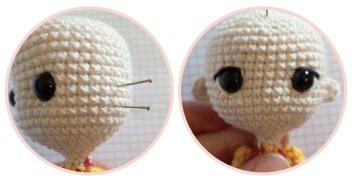
CHEEKS x2
6sc in MR
Sl st and fo, leave a long end for sewing
Sew them below the eyes. See pics
Apply blush on the nose and around the cheeks if you want
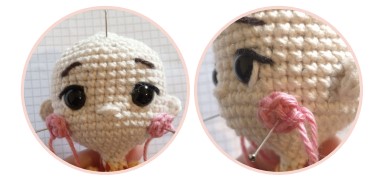
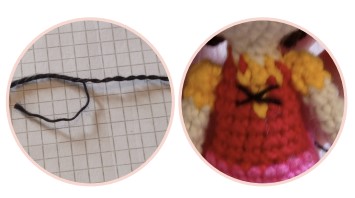
EMBROIDERY
Eyes
Nose: 3sts long, one Rbelow the eyes
Eyebrows: 3sts long between R35-36 and between R34-35
Embroider an x on the chest with thin black yarn, or divide your thread in thinner parts.
HAIR
BASE
R1. 6sc in MR (6)
R2. 6inc (12)
R3. (sc, inc) x6 (18)
R4. (sc, inc, sc) x6 (24)
R4. (sc, inc, sc) x6 (24)
R5. (3sc, inc) x6 (30)
R6. (2sc, inc, 2sc) x6 (36)
R7. (5sc, inc) x6 (42)
R8-10. 42sc (42)
R11. (3sc, inc, 3sc) x6 (48)
R12-13. 48sc (48)
Don’t cut yarn
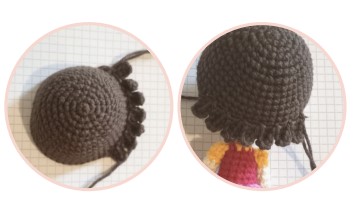
BOTTOM PART
*ch5, starting from 3rd ch from hook make 3hdc all along the ch, sk1 st of the base, sl st in the next st*
Repeat ** until you have a total of 7 strands.
Fo, leave a long end for sewing if you don’t want to use glue
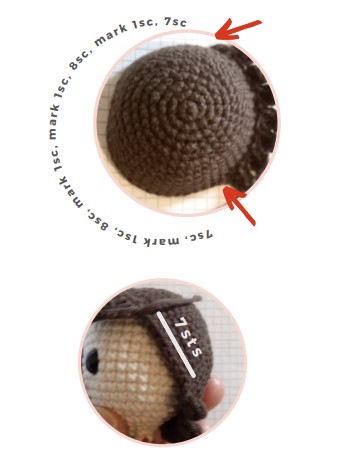
FRINGE
We have to mark the position of the fringe.
You should have 34sts in total.
From each side of the bottom strands count 7 sts and put a st marker in the 8th st, count other 8sts and put a st marker in the 9th st.
Here’s an image that shows you better what to do and the count.
Row1. Join yarn with a stsc (count as a st) on the right side at the 8th st, where you put the st marker, 8sc, sl st. turn work without doing a turning ch (10)
Row2. sk1, 5sc, 2hdc, 2dc, ch2 and turn (9)
Row3. sk1, dc, 2hdc, 4sc, sl st, turn work without doing a turning ch (8)
Row4. sk1, 3sc, 3hdc, dc (7)
Fo, leave a long end for sewing.
Do the same on the left side but work with the wig inside out.
Try the wig on the doll and check that everything is ok and equal on both sides.
TIP: Use a pin to mark the center of the wig on the doll, so that you know where to place the wig exactly.
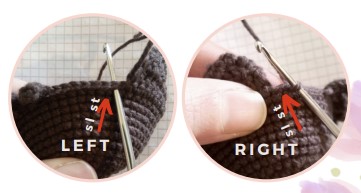
SIDE STRAND
In the left side you start from the st next to the fringe and sl st at the end in the st next to it, going down towards the bottom.
In the right side you start crocheting from the 2nd st next to the fringe and sl st at the end in the st next to the fringe, going up towards the fringe.
HAIR
Ch6, 5sc, sl st. Leave a long end for sewing or weave in ends if you want to glue them.
You can sew the wig on or you can glue it. I decided to glue it.
I used hot glue so I didn’t have to wait for it to dry, but my yarn is 100% cotton, I recommend to try it first if you’re using acrylic yarn or other types.
Glue the side strands as well.
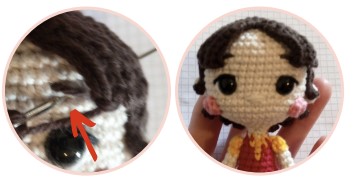
Sew the fringe with the tails left, or better just make the tails pass through the doll (see pics below) behind the head. Don’t have to roll the fringe. Tie a knot and hide it inside the wig. You shouldn’t see anything.
REBEL STRAND
From row2 to row6 always turn your work at the end but don’t do the turning ch.
Row1. ch7 (6)
Row2. 6sc (6)
Row3. sk1, 4sc, sl st (5)
Row4. sk1, 3sc, sl st (4)
Row5. sk1, 2sc, sl st (3)
Row6. sk1, sc, sl st (2)
Row7. sk1, sc in the sl st (1)

Fo and leave a long end for sewing
(unless you want to glue it)
It should naturally curve, if it doesn’t just fix it with your hands.
Congratulations!
Your Heidi doll is ready!
Crochet Heidi Doll Amigurumi PDF Free Pattern is a delightful and easy-to-follow pattern for creating a charming amigurumi doll inspired by the beloved character, Heidi. This pattern is perfect for both beginners and experienced crocheters looking to create a cute and huggable toy. The pattern includes detailed instructions and step-by-step photos to guide you through the process of creating Heidi’s iconic look. With a little bit of yarn and your crochet skills, you can bring this timeless character to life in the comfort of your own home. Download the free pattern today and start crafting your very own Heidi Doll Amigurumi!

Comments0