
Hello friends, today’s amigurumi pattern is a little different. Although it looks like a crochet bunny pattern, I think it belongs to a Russian cartoon. Amigurumi is made using velvet thread. You need to use a slightly large hook. Amigurumi has a fairly large size. I hope you enjoy this cute bunny amigurumi pattern. If we’re ready now, let’s get started.
Designer: miss_leo
Material used:
1. Plush yarn (Himalaya Dolphin Baby color 80335 or analogues) – 2 skeins A little white plush yarn (for eyes and teeth)
2. A little black, blue and pink yarn (YarnArt Jeans), for the nose, mouth and pupils.
3. Hook of the right size (I used 3.5)
4. Marker for loops.
5. Needle and floss (or strong yarn) for stitching parts
6. Filler (holofiber, sintepukh)
7. Good mood, DEFINITELY)))
We crochet in a spiral, do not forget to mark the beginning of the row with a marker.
Abbreviations
AR – Amigurumi Magic ring
MR – Amigurumi Magic ring
3in1 – crochet 3 columns in one loop
sc : Single Crochet
inc : Increase
dec : Decrease
tr : Triple Crochet/ Treble Crochet
st: Stitch
dc : Double Crochet
hdc: Half Double Crochet
sl-st or Slst: Slip Stitch
ch : Chain
..in : make increase into same stitch as many as the number which is given in front of “inc” abbreviation (exp; 3inc, 4inc..).
FLO : Crochet into front loops only
BLO : Crochet into back loops only
Body:
1 Rnd: 6 sc in MR
2 Rnd: 6 inc (12)
3 Rnd: (sc, inc)x6 (18)
4 Rnd: (sc, inc, sc)x6 (24)
5 Rnd: (3 sc, inc)x6 (30)
6 Rnd: (2 sc, inc, 2 sc)x6 (36)
7 Rnd: (inc, 5 sc)x6 (42)
8 Rnd: (3 sc, inc, 3 sc)x6 (48)
9 Rnd: (7 sc, inc)x6 (54)
10 Rnd: (4 sc, inc, 4 sc)x6 (60)
11 Rnd: (9 sc, inc)x6 (66)
12 Rnd: (5 sc, inc, 5 sc)x6 (72)
13-23 Rnd: without changes 72sc.
24 Rnd: (5 sc, dec, 5 sc)x6 (66)
25 Rnd: (9 sc, dec)x6 (60)
26 Rnd: (4 sc, dec, 4 sc)x6 (54)
27 Rnd: (7 sc, dec)x6 (48)
28 Rnd: (3 sc, dec, 3 sc)x6 (42)
29 Rnd: (dec, 5 sc)x6 (36)
30 Rnd: (2 sc, dec, 2 sc)x6 (30)
We start stuffing the body with holofiber
31 Rnd: (3 sc, dec)x6 (24)
32 Rnd: (sc, dec, sc)x6 (18)
33 Rnd: (sc, dec)x6 (12)
34 Rnd: 6 dec (6)
Fasten the yarn, cut. Hide the end.
Ears (2 parts):
1 Rnd: 6 sc in MR
2 Rnd: 6 inc (12)
3 Rnd: (1sc., inc)x6 (18)
4 Rnd: (2sc., inc)x6 (24)
5 Rnd: (3sc., inc)x6 (30)
6-10 Rnd: without changes 30sc.
11 Rnd: (dec., 13sc)x2 (28)
12 Rnd: (dec., 12sc)x2 (26)
13 Rnd: (dec., 11sc)x2 (24)
14 Rnd: (dec., 10sc)x2 (22)
15 Rnd: (dec., 9sc)x2 (20)
16 Rnd: (dec., 8sc)x2 (18)
17 Rnd: (dec., 7sc)x2 (16)
18 Rnd: (dec., 6sc)x2 (14)
19-23 Rnd: without changes 14 sc. Cut the yarn, fill the ears lightly with filler and sew around the top of the head.
Handles (2 parts):
1 Rnd: 6 sc in MR
2 Rnd: 6 inc (12)
3 Rnd: (1sc., inc)x6 (18)
4-6 Rnd: without changes 18 sc.
7 Rnd: 3 dec., 12 sc. (15)
Fill the handle with filler (bottom only).
8 Rnd: 2 dec., 11 sc. (13)
9 Rnd: 1 dec., 11 sc. (12)
10 Rnd: without changes 12 sc.
Fold in half and crochet 5 sc.
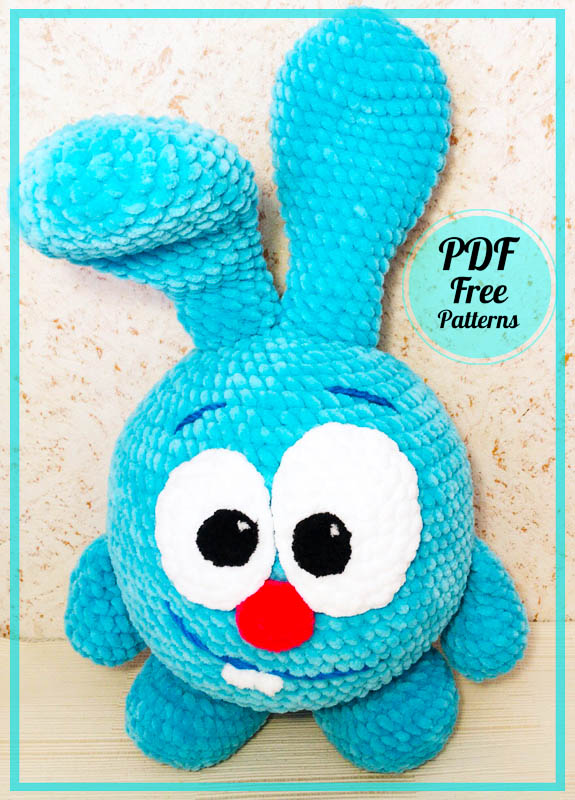
Sew to the body guided by the photo (see below)
Legs (2 parts):
Make 6 ch
1 Rnd: from 2 from the hook of the loop 4sc, 3sc in 1 loop, turn the crocheting and continue 3 sc, inc. (12)
2 Rnd: inc,3sc, 3inc, 3sc, 2inc (18)
3 Rnd: 1sc,inc, 3sc, (1sc, inc)x3, 3sc. (1sc, inc)x2 (24)
4 Rnd: 2sc,inc, 3sc, (2sc, inc)x3, 3sc. (2sc, inc)x2 (30)
5 Rnd: 3sc,inc, 3sc, (3sc, inc)x3, 3sc. (3sc, inc)x2 (36)
6 Rnd: BLO of the previous row 36 sc.
7-8 Rnd: without changes 36 sc.
9 Rnd: 10 sc, 8 dec, 10 sc. (28)
10 Rnd: 10 sc, 4 dec, 10 sc. (24)
11-12 Rnd: without changes 24 sc.
Stuff tightly.
We cut the yarn and sew the legs to the body in a circle.
Left eye:
We crochet in white.
Make 6 ch
1 Rnd: from 2 from the hook of the loop 4sc, 3sc in 1 loop, turn the crocheting and continue 3 sc, inc. (12)
2 Rnd: inc,3sc, 3inc, 3sc, 2inc (18)
3 Rnd: 1sc,inc, 3sc, (1sc, inc)x3, 3sc. (1sc, inc)x2 (24)
4 Rnd: 1 sc, 1Slst (connecting column) cut the yarn.
Right eye:
We crochet in white.
Make 6 ch
1 Rnd: from 2 from the hook of the loop 4sc, 3sc in 1 loop, turn the crocheting and continue 3 sc, inc. (12)
2 Rnd: inc,3sc, 3inc, 3sc, 2inc (18)
3 Rnd: 1sc,inc, 3sc, (1sc, inc)x3, 3sc. (1sc, inc)x2 (24)
4 Rnd: 2sc,inc, 3sc, (2sc, inc)x3, 3sc. (2sc, inc)x2 (30)
5 Rnd: 1 sc, 1Slst (connecting column) cut the yarn.
Pupils (2 parts):
We crochet with black yarn:
1 Rnd: 6 sc in MR
2 Rnd: 6 inc (12)
3 Rnd: 1 Slst (connecting column)
We cut the yarn leaving a long tail for sewing to the white part of the eye.
Spout:
We crochet with a pink yarn:
1 Rnd: 6 sc in MR
2 Rnd: 6 inc (12)
3 Rnd: (sc, inc)x6 (18)
4-5 Rnd: without changes 18 sc.
6 Rnd: (sc, dec)x6 (12) fill with filler
We cut the yarn, leaving a long tail for sewing to the body.
Tail:
1 Rnd: 6 sc in MR
2 Rnd: 6 inc (12)
3 Rnd: (sc, inc)x6 (18)
4-5 Rnd: without changes 18 sc.
6 Rnd: (sc, dec)x6 (12) fill with filler
We cut the yarn, leaving a long tail for sewing to the body.
Focusing on the photo, we sew Ears, handles, legs, eyes, tail, nose.
We sew the pupils to the eyes and then only to the body.
Embroider the mouth and eyebrows.
You can leave it like this or embroider a tooth
(a couple of stitches of white plush yarn, and separate with black yarn)
Crochet Kroshik Bunny Amigurumi is a free PDF pattern that provides step-by-step instructions for creating a cute and adorable bunny amigurumi. This pattern is perfect for beginners who are looking to learn the basics of crocheting amigurumi. The Kroshik Bunny is a popular character from VeggieTales and is known for its mischievous behavior. With this pattern, you can create your own little Kroshik Bunny to decorate your home or give as a gift to a loved one. The pattern includes detailed instructions, diagrams, and photos to help you along the way. Whether you’re a seasoned crocheter or just starting out, this pattern is sure to provide hours of fun and satisfaction. So why not give it a try and create your own adorable Kroshik Bunny amigurumi today!


Comments0