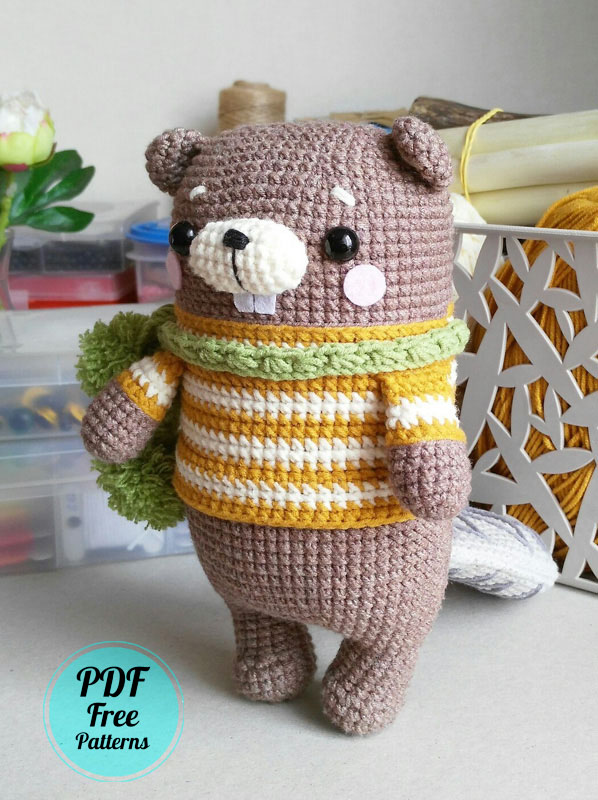
Hello my dears, today I will share a very professional teddy bear amigurumi pattern. I have shared the teddy bear amigurumi pattern many times before. However, although some amigurumi toys are very difficult to make, they can become much easier due to the well-prepared pattern. The teddy bear amigurumi pattern that I will share today is one of them. We cannot ignore that the teddy bear, which has a very beautiful coat made in yellow and white, has a very nice scarf. Now if you’re ready, let’s get started.
Designer: mycrochetwonders
Materials and tools:
1. Sport/5 ply (12 wpi) yarn
The main color Alize Cotton Gold №688 – coffee-beige mélange (approx. 30 g.)
For the jacket and scarf Alize Cotton Gold №2 – mustard, №385 – green, №1 – milk.
For the tail Alize Cotton Gold №87 – coal grey, Yarn Art Jeans №49 – grey.
2. 2.00 mm or 1.75 mm hook size
3. Stuffing (hollofayber).
4. Two black halfbeads 10 mm in diameter.
5. A black thread for the embroidering of the nose.
6. A needle with a big eye.
7. A moment glue.
8. A device for making the pompons or a strong cardboard.
9. Pieces of the white and pink felt.
Abbreviations
st – stitch;
ch – chain;
sc – single crochet;
inc – increase (crochet 2 sc in one loop);
dec – decrease (crochet 2 sc together);
sl st – slip stitch;
(sc, inc) х n – repeat those in brackets n-times.
The size of the ready toy is approx. 20 cm.
All the details except the scarf are crocheted in a spiral.
This toy is remarkable with the fact that in the course of crocheting of the head and body was crocheted only 6 decreases. I.e. we will not see on our little beaver those seams, which we always get when we crochet the course of the decreases. Nothing will upset us and nothing will be an eyesore to us)))
ARMS (2 pcs)
Brown color.
1 rnd: 6 sc in the magic ring
2 rnd: 6 inc (12)
3 rnd: (3 sc, inc) х 3 (15)
4-7 rnd: 4 rows – 1 sc in each st around (15)
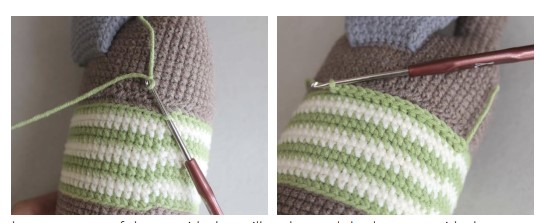
8 rnd: green color sl st in each back loop of the 7th row (15)
9 rnd: sc, grasping the back loops of the 7th and 8th rows (15)
10 rnd: milk color (3 sc, dec) х 3 (12)
11 rnd: milk color 1 sc in each st around (12)
12-13 rnd: 2 rows with the green color – 1 sc in each st around (12)
Crochet 3-4 sc more, so as the hook appeared to be at the edge.
Stuff the arm softly, not reaching the top. Fold the edges in half and crochet 5 sc hooking the both edges.
You can either sew or crochet in the arms. If you want to sew them, then leave a long thread enough for sewing. If you choose the second variant – fasten off the thread, hide the end inside. In this crochet pattern I’ll sew the arms.
TAIL:
Grey color.
1 rnd: 6 sc in the magic ring
2 rnd: 6 inc (12)
3 rnd: (1 sc, inc) х 6 (18)
4 rnd: (2 sc, inc) х 6 (24)
5 rnd: (3 sc, inc) х 6 (30)
6 rnd: (4 sc, inc) х 6 (36)
7-8 rnd: 2 rows – 1 sc in each st around (36)
9 rnd: (5 sc, inc) х 6 (42)
10-15 rnd: 6 rows – 1 sc in each st around (42)
16 rnd: (5 sc, dec) х 6 (36)
17-22 rnd: 6 rows – 1 sc in each st around (36)
23 rnd: (4 sc, dec) х 6 (30)
24-26 rnd: 3 rows – 1 sc in each st around (30)
27 rnd: (3 sc, dec) х 6 (24)
28-30 rnd: 3 rows – 1 sc in each st around (24)
31 rnd: (2 sc, dec) х 6 (18)
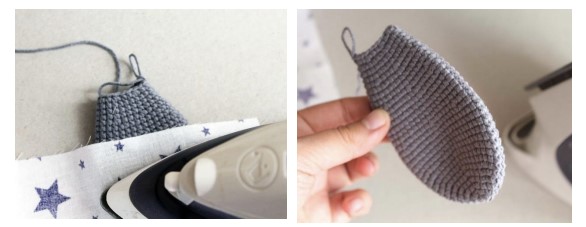
Fold the tail in half and iron it through the cloth.
Put some stuffing, crochet 8 sc hooking the both edges.
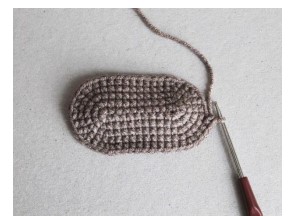
LEGS (2 pcs)
Brown color.
1 rnd: 6 sc in the magic ring
2 rnd: 6 inc (12)
3 rnd: (1 sc, inc) х 6 (18)
4-5 rnd: 2 rows – 1 sc in each st around (18)
6 rnd: 6 sc, 3 dec, 6 sc (15)
7-11 rnd: 5 rows – 1 sc in each st around (15)
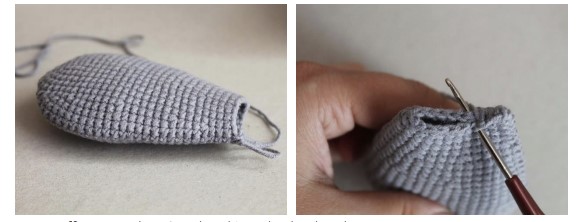
Cut the yarn and fasten off at the first leg.
For the second leg crochet 5-6 sc more, so as to turn out at the inner side of the leg, leave the loop opened.

Put the legs together, so as the toes will look forward. Mark a loop at the first leg, which adjoins with the opened loop of the second leg.
BODY (the lower part):
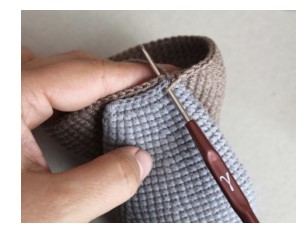
Crochet 6 ch from the opened loop of the second leg, take the first leg, insert the hook in the earlier marked loop – here will be the beginning of the row of the body (you are at the back, you can put the marker here).
1 rnd: crochet round the first leg 15 sc, then 6 sc along the chain, 15 sc along the second leg and 6 sc along the chain. In total we get 42 stitches in this row.

2 rnd: (6 sc, inc) х 6 (48)
3 rnd: (7 sc, inc) х 6 (54)
4-5 rnd: 1 sc in each st around (54)
6 rnd: (8 sc, inc) х 6 (60)
7-10 rnd: 4 rows – 1 sc in each st around (60)
11 rnd: 1 sc in each st around crocheting in the tail
I place the tail as follows: 51 sc, 8 sc together with the tail, 1 sc (60) (as we crochet the toy in spiral rows, then you can have the errors and, perhaps, you’ll need to move the tail for 1-2 stitches to the right)
12-16 rnd: 5 rows – 1 sc in each st around (60)
Leave a long thread enough for sewing and put aside the detail.
HEAD and BODY (the upper part):
Crochet 11 ch with brown color.
1 rnd: begin crocheting from the 2nd loop from the hook – inc, 8 sc, 4 sc in the last loop of the chain. Further crochet along the other side of the chain 8 sc, inc (24)
2 rnd: 2 inc, 8 sc, 4 inc, 8 sc, 2 inc (32)
3 rnd: (1 sc, inc) х 2, 8 sc, (1 sc, inc) х 4 times, 8 sc, (1 sc, inc) х 2 (40)
4 rnd: 1 sc in each st around (40)
5 rnd: (2 sc, inc) х 2, 8 sc, (2 sc, inc) х 4 times, 8 sc, (2 sc, inc) х 2 (48)
6 rnd: 1 sc in each st around (48)
7 rnd: (7 sc, inc) х 6 (54)
8 rnd: (8 sc, inc) х 6 (60)
9-18 rnd: 10 rows – 1 sc in each st around (60)
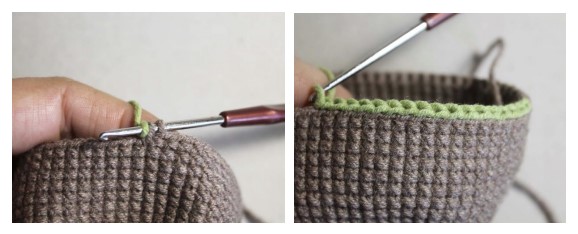
Change the color to the green.
19 rnd: sl st in each back loop of the 18th row (60)
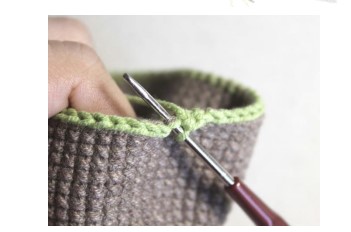
20 rnd: sc, grasping the back loops of the 19th and 18th rows (60)
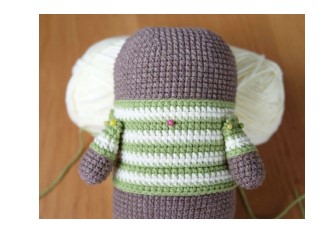
21-22 rnd: 2 rows with the milk color – 1 sc in each st around (60)
Further in the 23rd row you can crochet in the arms at the sides of the body. The space between the arms is 17 stitches. I.e. find the stitch in the center of the breast and count out 8 stitches to each side and from them place the arms. Or you can sew the arms later.
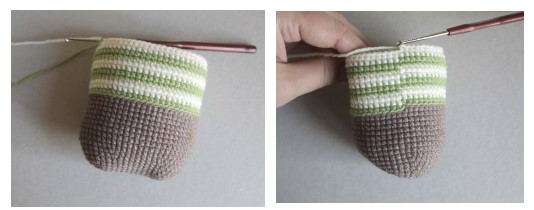
23-24 rnd: 2 rows with the green color – 1 sc in each st around (60)
25-26 rnd: 2 rows with the milk color – 1 sc in each st around (60)
27-28 rnd: 2 rows with the green color – 1 sc in each st around (60)
29-30 rnd: 2 rows with the milk color – 1 sc in each st around (60)
31 rnd: with the green color 1 sc in each st around (60)
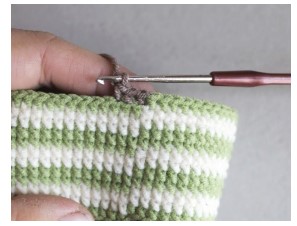
32 rnd: with the brown color sc in each back loop (60)
Fasten off and cut the yarn.

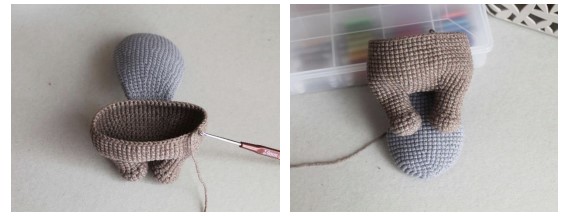
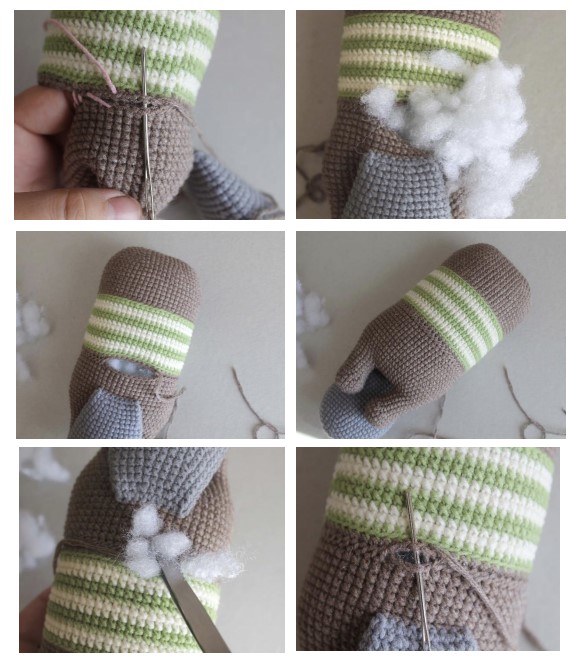
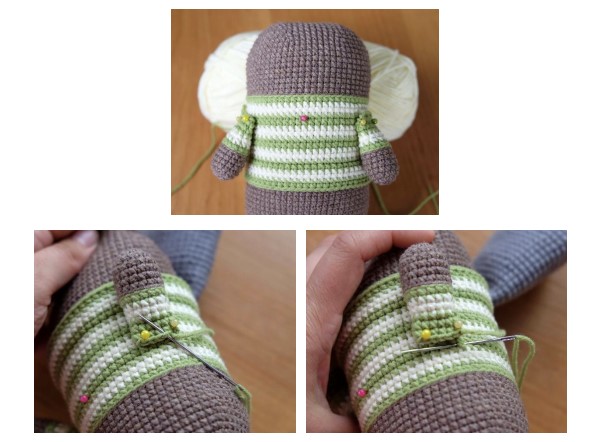
Put the stuffing in the body and head. Connect these two parts.
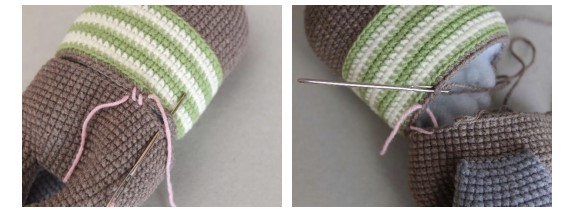
For the convenience mark the middle of each detail with the marker, connect the markers and baste the parts of the body with a contrast thread.
Then sew the details with the brown thread. Do not forget to put the enough amount of stuffing before closing the opening.
Crochet the JACKET to the end
Make a loop with a green yarn and pass it through the loop of the 31st row of the body. Further 1 ch and beginning from this very loop crochet one row of the sc.
Then crochet two rows of the sc with the milk color and the last row with the green color.
Fasten off and hide the end of the thread inside.

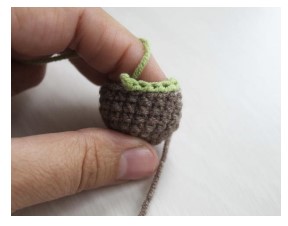
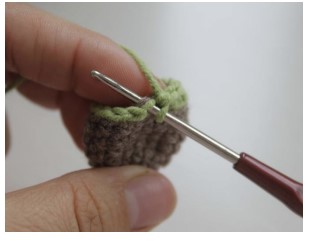
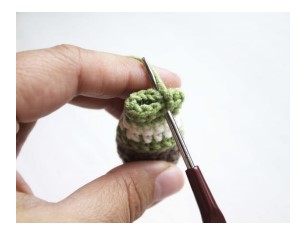
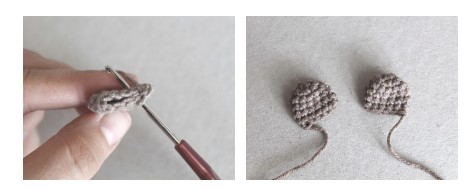
EARS:
1 rnd: 6 sc in the magic ring
2 rnd: 6 inc (12)
3-5 rnd: 3 rows – 1 sc in each st around (12)
Fold the ear in half and crochet the sc grasping the both edges. Leave the threads enough for sewing.
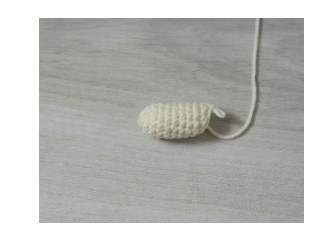
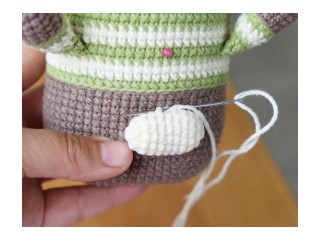
MUZZLE:
1 rnd: 6 sc in the magic ring
2 rnd: 6 inc (12)
3-9 rnd: 7 rows – 1 sc in each st around (12)
10 rnd: 6 dec
Put a little stuffing, leave a thread enough for sewing and tighten the opening.
SCARF:
Crochet chain 96 ch + 2 ch.
1. Insert the hook in the 3rd loop from the hook, draw out the thread, then insert the hook in the next loop and again draw out the thread, repeat this action one more time.
2. Crochet all 4 loops, which are on the hook, crochet 2 ch.
Beginning from the next stitch again by turns draw out each of three loops and crochet them together, crochet 2 ch.
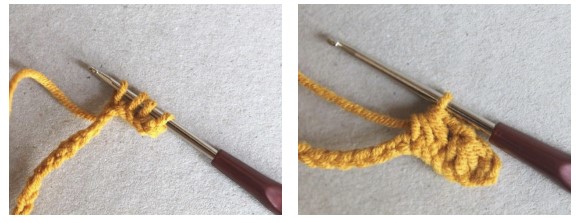
Crochet in such a way till the end of the chain.
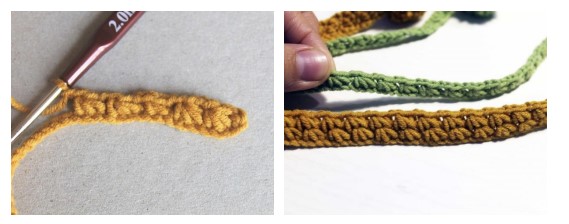
To make the scarf wider, crochet one more such row, attaching the yarn at the right side of the scarf.
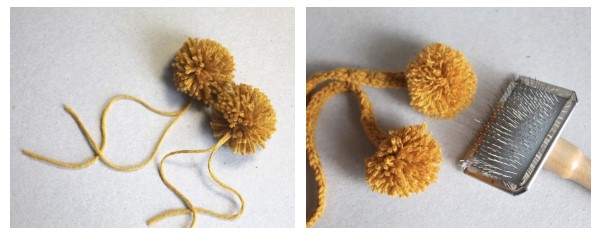
Make two pompons with the help of the special devices. If you have no such devices, you can use a cardboard.
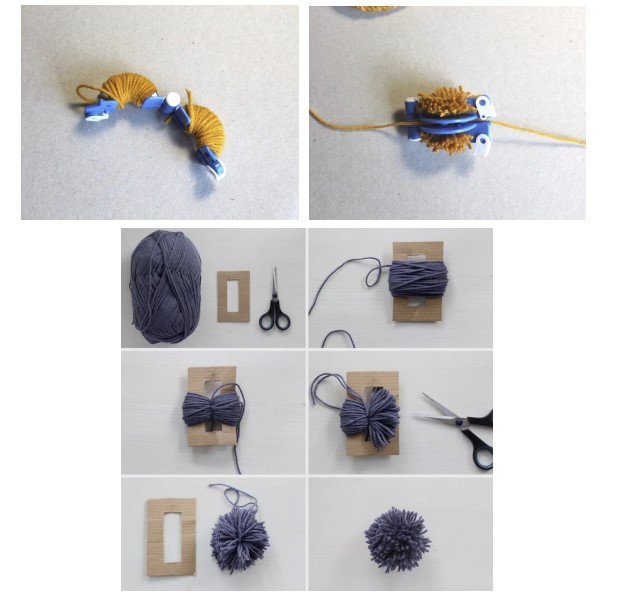
Fluff the pompons with a comb with frequent teeth or with a special comb for the cats.
ASSEMBLY AND DECORATION:
Sew the arms at the level of the 23rd row of the upper part of the body. Find the central stitch at the breast and count out 8 stitches to each side. You should get the space 17 stitches wide – at this space place the arms.
Sew the muzzle in the middle of the head between the 12 and 16 rows.
Embroider the nose with a black thread. Sew the ears. Glue the eyes.
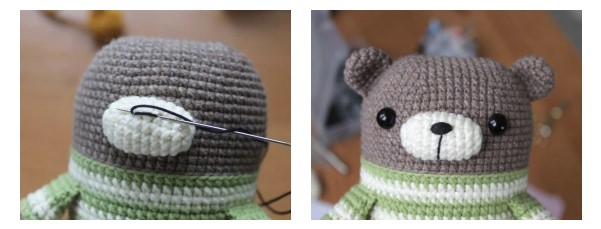
Make a couple of stitches with a beige yarn for the brows. Cut out the teeth from white felt, from pink felt cut out the cheeks and glue them. Tie the scarf by the pompons to the side))
Introducing the “Crochet Little Bear Amigurumi PDF Free Pattern,” aIntroducing the “Crochet Little Bear Amigurumi PDF Free Pattern,” a delightful and charming pattern for all crochet enthusiasts. This pattern offers an easy-to-follow guide to create a cute and huggable little bear, perfect for both beginners and experienced crocheters.
The pattern provides detailed instructions with clear illustrations, ensuring that even those new to amigurumi can create a beautiful and lifelike little bear. The use of high-quality yarn and precise stitches will result in a soft and cuddly companion that is sure to become a treasured addition to any child’s toy collection or a lovely decoration for your home.
This free pattern includes step-by-step guidance on creating the bear’s body, arms, legs, and facial features, as well as instructions for adding optional accessories such as a scarf or hat. The pattern also includes tips on adjusting the size of the bear to suit your preferences, making it versatile for a wide range of projects.
With its charming design and ease of construction, the “Crochet Little Bear Amigurumi PDF Free Pattern” is an excellent choice for anyone looking to create a handmade gift or simply enjoy the satisfaction of crafting their own unique creation. So why wait? Download the pattern today and embark on a fun and rewarding crochet journey!


Comments0