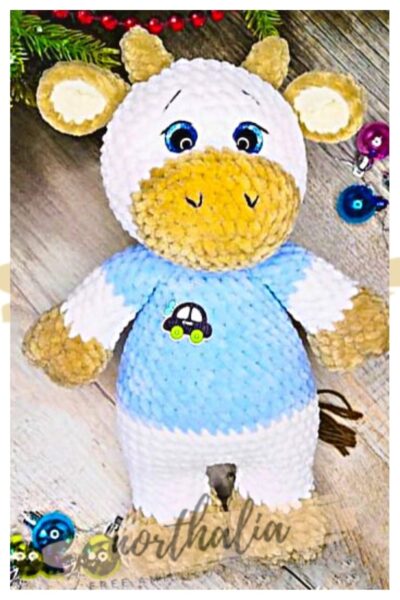
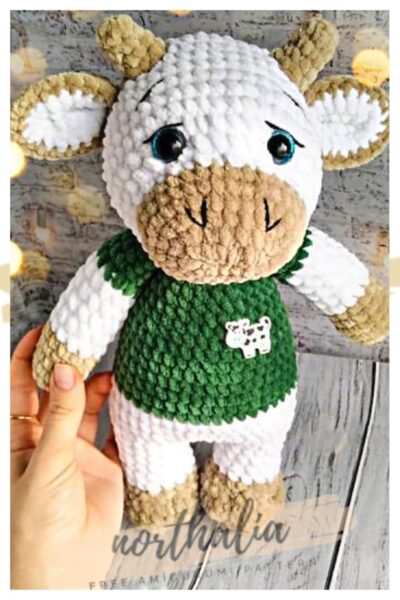
add a new one to the free amigurumi pattern. You can always follow us to reach the newest, most popular, most accurate pattern. Here is Crochet Cow Pattern;
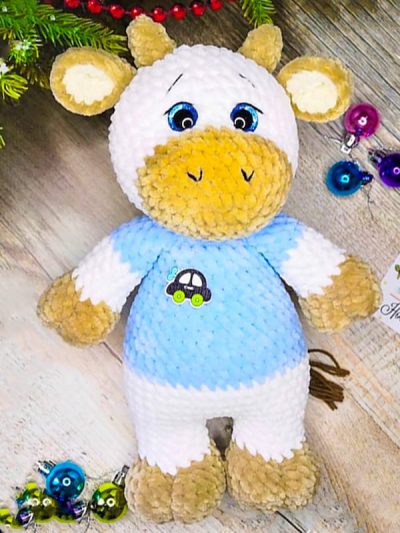
Designer: rakita.toys
Necessary materials
• Yarn himalaya dolphin baby (color No80301, No80317, No80306,)
• Crochet hook No3.5; No4
• Filler (holofiber)
• Yarn for tightening the muzzle (YarnArt jeans white)
• Yarn for tightening the upper and lower legs and for tail tip (YarnArt jeans brown)
• A plastic needle with a wide eye (for sewing details)
• Long needle (for tightening the muzzle)
• Eyes 16 mm on a secure mount
• Yarn “Iris”, black (for eyebrows)
• Scissors
Abbreviations
MR- Magic ring
Ch- Chain
Inc- Increase
Dec- Decrease
Sl st- Slip stitch
(*)- repeat, the number of times specified.
• The size of the finished amigurumi toy will be approximately 30 cm using the same materials.
Head
We crochet with color No80317
Rnd 1. 7 ch
Rnd 2. From the 2nd loop from the hook: 5sc, 3 sc last, 4sc, inc (14)
Rnd 3. inc, 4 sc, inc*3, 4 sc, inc*2 (20)
Rnd 4. 1 sc,inc, 5 sc, inc,3 sc, inc, 5 sc, inc, 2 sc (24)
Rnd 5. (3 sc, inc)*6 ( 30)
Rnd 6-7. 30 sc
Change the color of the yarn to No80301 (white)
Insert eyes between 8 and 9 side by side.
Rnd 8. 30 sc
Rnd 9. (4 sc, inc)*6 (36)
Rnd 10. (5 sc, inc)*6 (42)
Rnd 11-17. 42 sc (7 rnds)
Rnd 18. (5 sc,dec)*6 (36)
Rnd 19. (4 sc,dec)*6 (30)
Rnd 20. (3 sc,dec)*6 (24)
We start stuffing our heads with holofiber.
Rnd 21. (2 sc,dec)*6 (18)
Rnd 22. (1 sc.dec)*6 (12)
Rnd 23. dec*6
We make sl st, tighten the top of the head and hide the thread inside the head.
Horns (Make 2)
Hook No3.5
We crochet with color No80317
Rnd 1. 2 ch, and in the second we crochet 4sc,
Rnd 2. (1 sc,inc)*2 (6)
Rnd 3. 6 sc
Rnd 4. (1 sc,inc)*3 (9)
Rnd 5. 4 sc, inc, 4 sc make sl st and cut the thread.
20 cm for sewing.
Ears (Make 2)
We crochet two parts in white No80301 and two
Details color No80317
First we crocheting two parts in white
Rnd 1. 7 ch
Rnd 2. From the 2nd loop from the hook: 5sc, 3 sc in the last 4 sc, inc (14)
Rnd 3. inc, 4sc , inc * 3, 4 sc, inc * 2 (20), make sl st and cut the thread.
Next crochet two parts with color No. 80317 and the thread is not cut off, and folded with a white part, wrong sides to each other and tie around the sc. At the end of the row we make sl st and cut thread about 20 cm for sewing.
Then we insert the thread into the needle and fold the eye in half and sew for the last 2 sc, then pull the thread to the beginning of the eyelet so that it is it is more convenient to sew to the head.
Lower legs and body
(in one piece)
For the first leg:
Getting Started No 80317
Rnd 1. 2 ch and in the second we crocheting 6 sc (6)
Rnd 2. inc*6 (12)
Rnd 3. (1sc, inc)* 6 (18)
Rnd 4. (2sc, inc)* 6 (24)
Rnd 5. 24 sc we crocheting behind the back wall
Rnd 6-7. 24 sc
Rnd 8. (2 sc, dec)* 6 (18)
Rnd 9. (4 sc, dec)* 3 (15)
Change yarn color to No 80301
Rnd 10-13. 15 sc, make sl st and cut the thread.
Second leg:
We crocheting in the same way as the first to the 13th row
Rnd 13. 15 sc +3 ch.
Rnd 14. 15 sc on the first leg, 3 sc, 18 sc (36)
We stuff the paws tightly
Rnd 15. (5 sc, inc)* 6 (42)
Rnd 16-18. 42 sc
Rnd 19. We crocheting 10 sc and change the color of the yarn to No30806.
Rnd 20-23. 42 sc
Rnd 24. (5 sc, dec)* 6 (36)
Rnd 25-26. 36 sc
Rnd 27. (4 sc, dec)* 6 (30)
Rnd 28-29. 30 sc
We start stuffing the body
Rnd 30. (3 sc, dec)* 6 (24)
Rnd 31-32. 24 sc
Rnd 33. (2 sc, dec)* 6 (18)
Rnd 34. 18 sc, do sl st
Leave a long thread for sewing on the head.
Upper Paws
Starting with color No 30317
Rnd 1. 2 ch, and in the second we crocheting 5sc,
Rnd 2. 5 inc (10)
Rnd 3. (1 sc, inc)* 5 (15)
Rnd 4-6. 15 sc
Rnd 7. dec* 2, 11 sc, (13)
Change color to white No80301
Rnd 8-12. 13 sc
Change color to blue No80306
Rnd 13-17. 13 sc, make sl st and cut the thread.
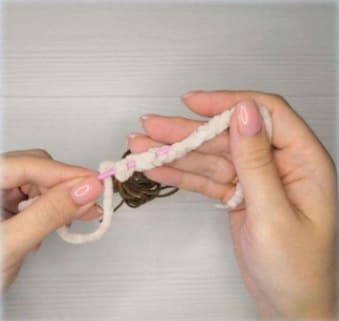
Tail
13 ch, pull out the last loop and insert a brown YarnArt jeans thread into it, which must be folded in several rows in advance, and then tighten this loop tightly.
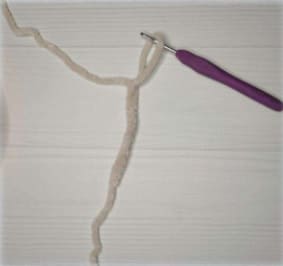
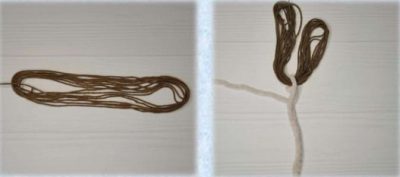
Next, cut the thread, leaving 15 cm.
We insert the thread into the needle and stretch it with the snake up, as shown in the photo.
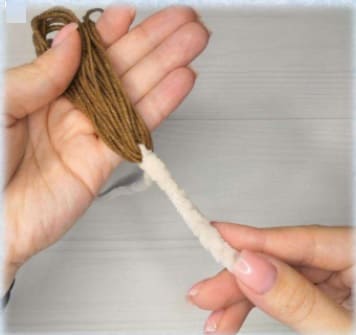
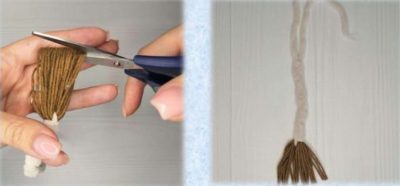
Then I cut the ends and the tail is ready.
Next, sew on the head, paws, tail, ears and horns.
We embroider eyebrows and eyelashes and our plush cow is ready!
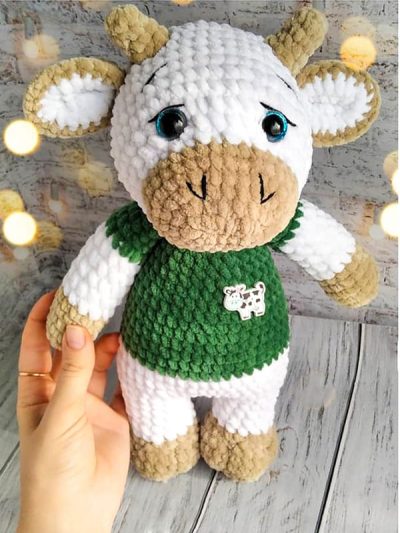
Finish Amigurumi Crochet Cow.


Comments0