Hello dear Amigurumi Followers
We add a new one to the free amigurumi patterns we have created for you. You can always get the most popular amigurumi patterns and the most preferred amigurumi crochet patterns on our site for free. Main crochets, amigurumi gazelles, amigurumi bears, amigurumi polar bears, amigurumi pandas, amigurumi penguins, amigurumi giraffes, amigurumi llama, amigurumi pigs, amigurumi rabbit, amigurumi clowns, amigurumi baby lambs, amigurumi lambs, amigurumi bees, amigurumi lambs dinosaurs, amigurumi elephants, amigurumi hippos, amigurumi monkeys, amigurumi cats, amigurumi dogs and more…
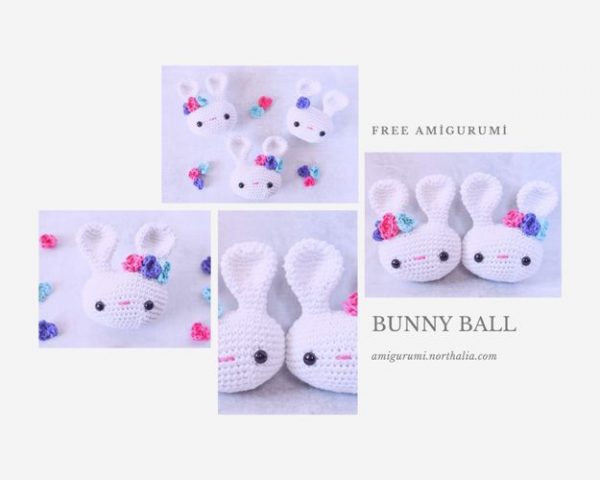
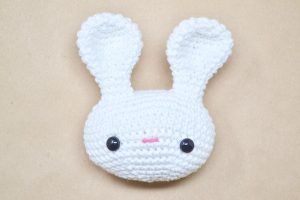
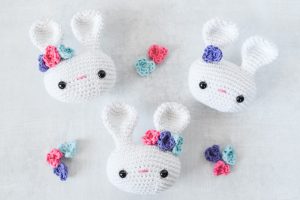
Our new free amigurumi crochet pattern Bunny Ball.
Here is our pattern;
 amigurumi
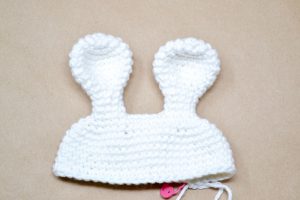
EAR 1
- Using color white
- R1: 6 sc into a magic circle {6 sts}Alternate way to begin: chain 2, sc 6 times in 2nd chain from hook {6 sts}
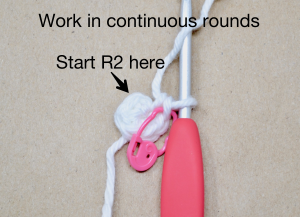
- R2: (inc) 6 times {12 sts}
- R3: (inc, sc in next st) 6 times {18 sts}
- R4: (inc, sc in next 2 sts) 6 times {24 sts}
- R5-6: sc in next 24 sts {24 sts}
- R7: (dec, sc in next 2 sts) 6 times {18 sts}
- R8: sc in next 18 sts {18 sts}
- R9: (dec, sc in next st) 6 times {12 sts}
- R10: sc in next 12 sts {12 sts}
- R11: (dec, sc in next 2 sts) 3 times {9 sts}
- R12-13: sc in next 9 sts {9 sts}
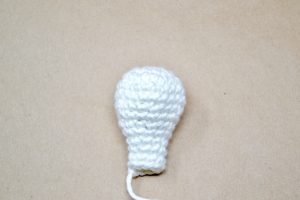
- Fasten off and leave a tail. No stuffing needed. Set aside.
EAR 2 AND HEAD
- Using color white
- R1: 6 sc into a magic circle {6 sts}Alternate way to begin: chain 2, sc 6 times in 2nd chain from hook {6 sts}
- R2: (inc) 6 times {12 sts}
- R3: (inc, sc in next st) 6 times {18 sts}
- R4: (inc, sc in next 2 sts) 6 times {24 sts}
- R5-6: sc in next 24 sts {24 sts}
- R7: (dec, sc in next 2 sts) 6 times {18 sts}
- R8: sc in next 18 sts {18 sts}
- R9: (dec, sc in next st) 6 times {12 sts}
- R10: sc in next 12 sts {12 sts}
- R11: (dec, sc in next 2 sts) 3 times {9 sts}
- R12-13: sc in next 9 sts {9 sts}
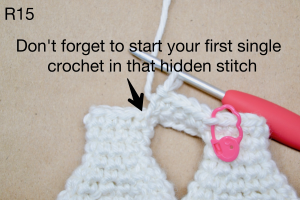
- R14 will be written out into steps with the whole round written below.We’re going to be connecting ear #2 to ear #1. Grab ear #1 and get ready to crochet into it.
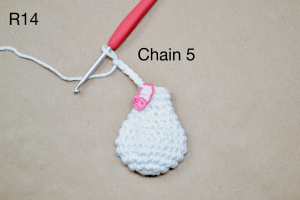
- R14: chain 5
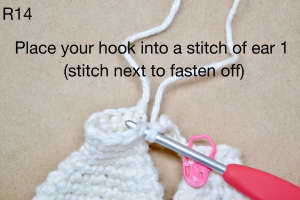
- R14: starting in the stitch next to the fasten off on ear #1, sc in next 9 sts
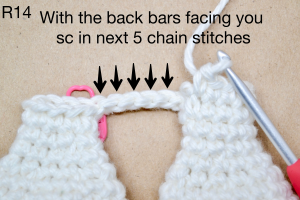
- R14: with the back bars of the chain stitches facing you, sc in next 5 chain sts
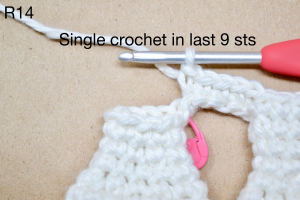
- R14: sc in next 9 sts {28 sts} (the bottom 5 chain stitches are included in the stitch count)R14: chain 5, starting in the stitch next to the fasten off on ear #1 sc in next 9 sts, with the back bars of the chain stitches facing you, sc in next 5 chain sts, sc in next 9 sts {28 sts} (the bottom 5 chain stitches are included in the stitch count)
- Tuck in the fastened off piece of ear #1 inside of the ear.
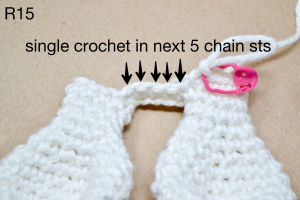
- R15: sc in next 5 chains, sc in next 3 sts, inc in next 3 sts, sc in next 11 sts, inc in next 3 sts, sc in next 3 sts {34 sts}

- R16: sc in next 10 sts, inc in next 4 sts, sc in next 12 sts, inc in next 4 sts, sc in next 4 sts {42 sts}
- R17: (inc, sc in next 6 sts) 6 times {48 sts}Place a stitch marker when you start R21 to mark that round. R21 is where you will place the eyes.
- R18-23: sc in next 48 sts {48 sts}
- R24: (dec, sc in next 6 sts) 6 times {42 sts}
- R25: (dec, sc in next 5 sts) 6 times {36 sts}
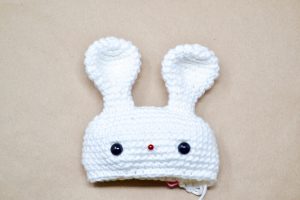
- Place 9mm safety eyes between R21 and 22, leaving 9 sts between the eyes.
- Stitch on pink nose, over one stitch, between R21 and 22.
- R26: (dec, sc in next 4 sts) 6 times {30 sts}
- R27: (dec, sc in next 3 sts) 6 times {24 sts}
- Place your crochet to the side and fill your stress ball.
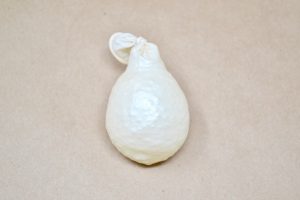
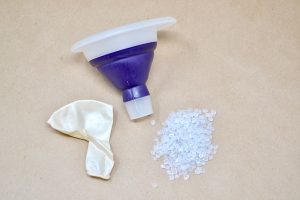
- Using a funnel, fill a standard sized balloon with poly-pellets or rice. Fill the balloon to about 1.5 inches wide as pictured. Place some poly-fil stuffing behind the eyes to cushion the safety eyes, tuck your balloon into the head and stuff with more poly-fil, as needed, as you crochet. Do not stuff the ears, flatten and indent them.
- R28: (dec, sc in next 2 sts) 6 times {18 sts}

- R29: (dec, sc in next st) 6 times {12 sts}
- R30: (dec) 6 times {6 sts}
- Fasten off and leave a long piece of yarn to sew the head shut.
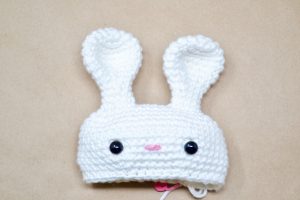
FLOWER
- Using color of choice
- Make 3
- R1: 3 sc into a magic circle {3 sts}Leave a long tail.
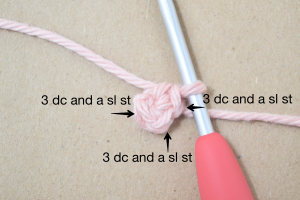
- R2: (3 dc and sl st into each stitch) 3 times {12 sts}Place 3 double crochet and then a slip stitch into the same stitch – repeat for all 3 stitches.
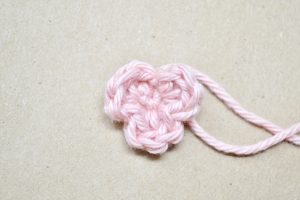
- Fasten off and leave a long tail.
- Weave the tail so it hits the middle back of the flower.If you plan on glueing the flowers on, make a knot in the back with the two tails and cut off the excess yarn.
- Set aside until assembly.
ASSEMBLY
- I recommend pinning the parts together before sewing the bunny together. This will give you a better idea of where you’d like the parts to be attached before actual assembly.
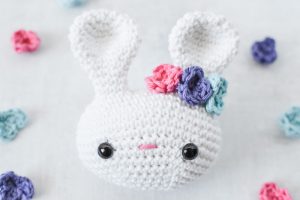
- Using the two strands of yarn from the flower, attach and secure with a knot. Weave in excess yarn.
- Start using your stress ball to melt away that stress:)

- Please be aware that amigurumi contains small pieces and can be dangerous to children.
- If you’re selling this stuffed ami, please place a warning and also state that safety eyes are not recommended for anyone under the age of 3.
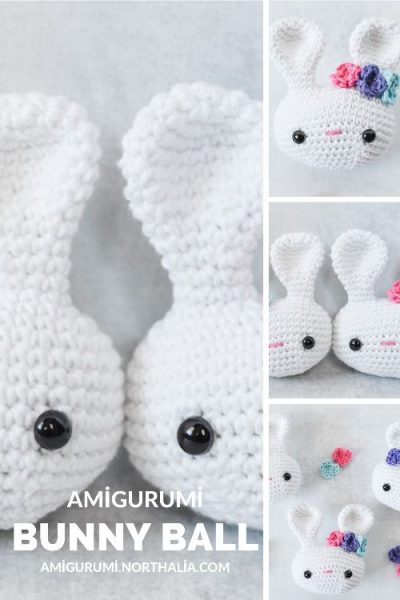 bunny ball


Comments0