
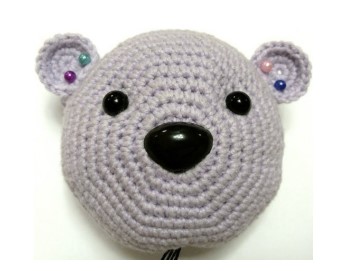
Hello friends. Today I prepared a gorgeous crochet teddy bear pattern. A bear amigurumi is very easy to make. It also has very impressive colors. She looks very cute, especially with her scarf. The foot and body are made as a whole. You will make the other parts separately and put them together. I think it will be easy. If you wish, you can decorate the teddy bear amigurumi by using small accessories. Now we will examine this free amigurumi pattern together. If you’re ready, let’s start.
When using these materials and tools, you should get a bear with a height of ~ 23cm.
Designer: sashasavina
Tools and materials:
* Yarn – Jeans from YarnArt (50g / 160m) lilac, pink and yellow, less than a skein of each color. Black iris for embroidering the mouth.
* Filler – holofiber.
* Hook 2.5.
* Plastic spout, half beads for eyes 8 mm.
* Scissors, long stitching needle, glue Moment gel.
Left leg:
1 Rnd – 6 sc in MR (6)
2 Rnd – inc × 6 times (12)
3 Rnd – 10 sc, 2 inc (14)
4 Rnd – 14 sc
5 Rnd – 12 sc, 2 inc (16)
6 Rnd – 16 sc
7 Rnd – 13 sc, 2 inc, 1 sc (18)
8 Rnd – 18 sc
9 Rnd – 15 sc, 2 inc, 1 sc (20)
10 Rnd – 20 sc
11 Rnd – 16 sc , 2 inc, 2 sc (22)
12 – 13 Rnd – 22 sc
14 Rnd – 7 sc, we fasten the yarn, cut it.

Right leg
Make similarly, in the 14th row we crochet 9 sc. Next, we crochet 8 ch, then 22 sc along the left leg, 8 sc along the ch chain, 22 sc along the right leg, 8 sc along the ch chain, put a marker (60).

Body:
1 Rnd – 60 sc
2 Rnd – 8sc, inc, 5sc, inc, 8sc, inc, 4sc, inc, 8sc, inc, 5sc, inc, 8sc, inc, 5sc, inc, sc (68)
3-8 Rnd – 68sc + 12sc from the marker, change the yarn to pink, rearrange the marker.
9 Rnd – 68 sc pink yarn
10 Rnd – 68 sc BLO
11 Rnd – 68 sc
12 Rnd – 32 sc, dec, 32 sc, dec (66)
13 Rnd – 66 sc
14 Rnd – 31 sc, dec, 31 sc, dec (64)
15 Rnd – 15 sc, dec, 30 sc, dec, 15 sc (62)
16 Rnd – 62 sc

We stuff the legs, then we stuff the body in the course of crocheting.
17 Rnd – 29 sc, dec, 29 sc, dec (60)
18 Rnd – 14 sc, dec, 28 sc, dec, 14 sc (58)
19 Rnd – 58 sc
20 Rnd – 27 sc, dec, 27 sc, dec (56)
21 Rnd – 13 sc, dec, 26 sc, dec, 13sc (54)
22 Rnd – 54 sc
23 Rnd – 25 sc, dec, 25sc, dec (52)
24 Rnd – 12 sc, dec, 24 sc, dec, 12sc (50)
25 Rnd – 50 sc
26 Rnd – 23 sc, dec, 23 sc, dec (48)
27 Rnd – 11 sc, dec, 22 sc, dec, 11 sc (46)
28 Rnd – 46 sc

29 Rnd – 21 sc, dec, 21 sc, dec (44)
30 Rnd – 10 sc, dec, 20 sc, dec, 10 sc (42)
31 Rnd – 42 sc
32 Rnd – 19 sc, dec, 28 sc, dec (40)
33 Rnd – 9 sc, dec, 18 sc, dec, 9 sc (38)
34 Rnd – 38 sc
35 Rnd – 17 sc, dec, 17 sc, dec (36)
36 Rnd – 8 sc, dec, 16 sc, dec, 8 sc (34)
37 Rnd – 34 sc
38 Rnd – 15 sc, dec, 15 sc, dec (32)
39 Rnd – 7 sc, dec, 14 sc, dec (30)
40 Rnd – 30 sc

Head:
1 Rnd – 8 sc in MR (8)
2 Rnd – inc × 8 times (16)
3 Rnd – (sc, inc )×8 (24)
4 Rnd – (2sc, inc ) ×8 (32)
5ряд – (3sc, inc ) × 8 (40)
6 Rnd – (4 sc, inc )× 8 (48)
7 Rnd – (5 sc, inc )×8 (56)

8 Rnd – (6 sc, inc )×8 (64)
9 Rnd – (7 sc, inc ) ×8 (72)
10 – 18 Rnd – 72 sc (9 rows )
19 Rnd – (7 sc, dec ) ×8 (64)
20 Rnd – 64 sc
21 Rnd – (6 sc, dec) ×8 (56)
22 Rnd – 56 sc
23 Rnd – (5 sc , dec )×8 (48)
24 Rnd – 48 sc

25 Rnd – (4 sc, dec )× 8 (40)
26 Rnd – (3 sc, dec )×8 (32)
We fill the part with filler
27 Rnd – (2 sc, dec )× 8 (24)
28 Rnd – (sc, dec ) ×8 (16)
29 Rnd – 8 dec (8)
We tighten the loops, hide the yarn inside the part. We make eye tightening.
Ears:
1 Rnd – 6sc in MR (6)
2 Rnd – inc × 6 times (12)
3 Rnd – (sc, inc )×6 (18)
4 Rnd – 16 sc. Fasten the yarn and cut.
Sew on the ears. Glue the nose and eyes, embroider the mouth.
Arms:
1 Rnd – 6 sc in MR (6)
2 Rnd – inc × 6 times (12)
3 Rnd – 11sc, inc (13)
4 Rnd – 13 sc
5 Rnd – 12 sc, inc (14)
6 Rnd – 14 sc
7 Rnd – 13 sc, inc (15)
8 Rnd – 15 sc
9 -10 Rnd – 15 sc + 6 sc
change the yarn to pink
10-23 Rnd – 15 sc
24 Rnd – 13 sc, dec (14)
25 Rnd – 12 sc, dec (13)
26 Rnd – 13 sc
27 Rnd – dec, 11sc (12)
28 Rnd – 6 dec (6)
We tighten the loops, cut the yarn, hide the needle inside the part.
Sew the head to the body. We fasten the arms to the body with a yarn fastening.

Snood:
Cast on 60 sts with yellow yarn on stocking needles no:3. Closure in a circle, knit 22 rows, close the loops.

We sew the edges, turn them over:

We pass the ties with a needle through the rows as in the photo:

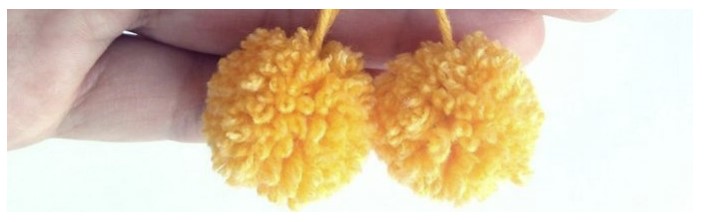
Sew pom-poms.

I propose to make pompoms on a fork.
We wind the yarn on the fork as in the photo:

With a needle we yarn the yarn between the fork, we tie the yarn in the middle.

Remove from the fork, tighten the yarn, make a knot. Cut on both sides:

Fluff, cut off long yarns, trim the pompom with scissors.
This is a free crochet pattern for an adorable and easy bear with a snood. The pattern is suitable for beginners and uses basic crochet stitches. The snood adds a cute and practical touch to the bear, making it perfect for winter or colder weather. The pattern includes detailed instructions and step-by-step photos to guide you through the process. You can customize the size of the bear to make it the perfect fit for your needs. This pattern is great for practicing new skills and creating a unique and personalized gift for loved ones.


Comments0