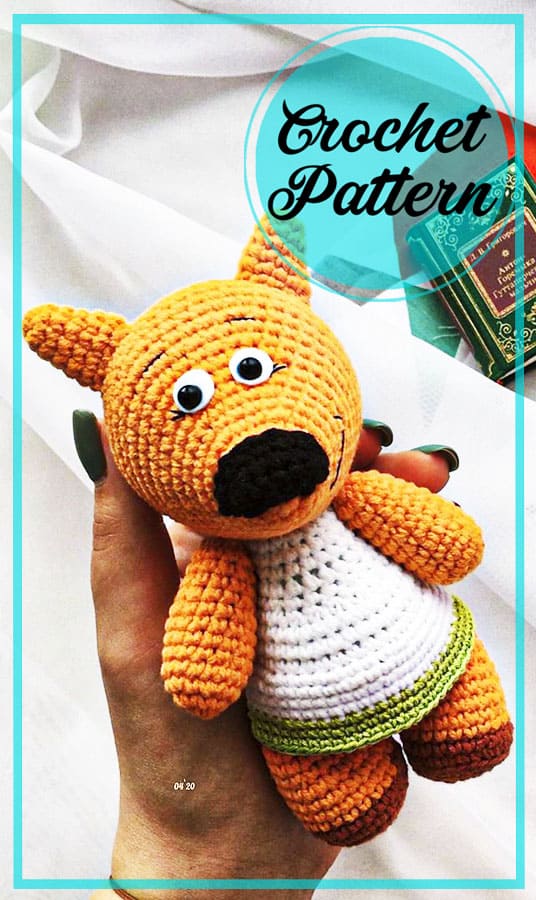
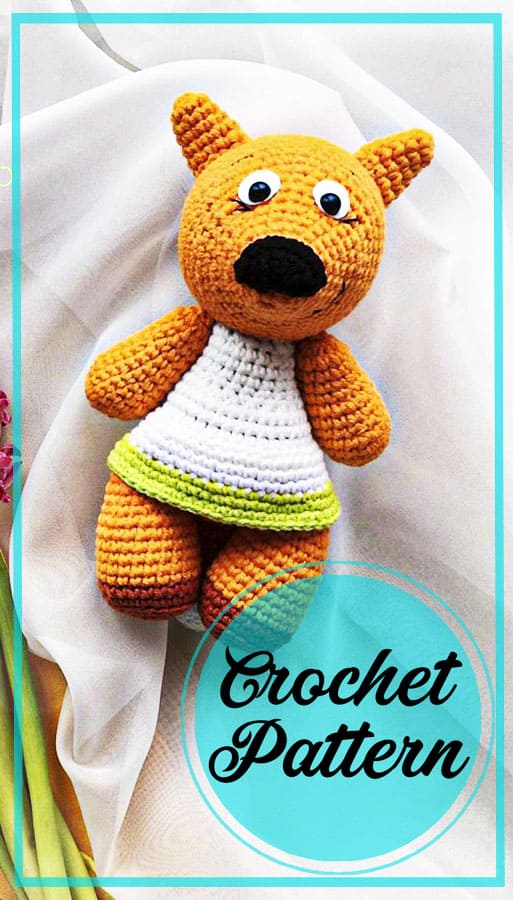
Hello friends. I continue to share different amigurumi posts as much as possible. The name of this cute amigurumi is mimi! When I first saw it, I thought it looked like a fox, and when I read the description, I realized that it had a nice teddy bear pattern.
In fact, the main reason we think of it as a fox is the color and nose of the amigurumi. The fact that its color is orange brings to mind the fox amigurumi. Thank you very much to @katerina_gapeeva who shared this cute amigurumi pattern for free. I will share the details below.
You can also save the pattern on your computer. If you add our site to your favorites, you will be more aware of our shares.
Free workshop from Yekaterina Gapeeva on knitting Chanterelles – a character from the children’s cartoon “Mi-mi-teddy bears”. The height of the crocheted toy is about 20 cm. To make such a fox, the author used Alize Cotton Gold yarn and a hook of 1.9 mm. Knitted fox from the cartoon “Mimimishki” will surely appeal to your child!
Author’s master class by Ekaterina Gapeeva.
This workshop is for individual use only. You are not allowed to sell or copy this master class. It is strictly forbidden to place the materials given in this master class on any
resources on the Internet, both in whole and in part.
The master class does not contain knitting lessons, it is intended for craftswomen (s) with crocheting skills.
When using these materials, you will receive a Chanterelle not more than 20 cm in height.
You can dispose of the toy at your discretion. When publishing, indicate the author of the description. Thanks!
Materials
Yarn: Alize Cotton Gold – Orange (83), White (55), Black (60), Terracotta (89), Green (612)
Hook No. 1.9
Needle with a large eye
Wool and felting needle or white foamiran
Eyes – half beads
Glue moment
Filler
Abbreviations
sc : Single Crochet
inc : Increase
dec : Decrease
tr : Triple Crochet/ Treble Crochet
st: Stitch
dc : Double Crochet
hdc: Half Double Crochet
sl-st : Slip Stitch
ch : Chain
..in : make increase into same stitch as many as the number which is given in front of “inc” abbreviation (exp; 3inc, 4inc..).
FLO : Crochet into front loops only
BLO : Crochet into back loops only
BL : Bobble Stitch – do 5dc all in the same stitch and then yarn over and pull through all the loops on your hook (the original loop + 1 loop for each partially completed dc).
Head
1. In orange, knit 6 sc into the amigurumi ring (6)
2. inc х 6 (12)
3. One Row unchanged (12)
4. (1 sc, inc) х 6 (18)
5. One Row unchanged (18)
6. (2 sc, inc) х 6 (24)
7. One Row unchanged (24)
8. (3 sc, inc) х 6 (30)
9. One Row unchanged (30)
10.(4 sc, inc) х 6 (36)
11. One Row unchanged (36)
12.(5 sc, inc) х6 (42)
13. One Row unchanged (42)
14.(6 sc, inc) х6 (48)
15.– 20. Knit 6 Rows without change (48)
21. (6 sc, dec) х6 (42)
22. (5 sc, dec) х6 (36)
23. (4 sc, dec) х6 (30) Start stuffing your head.
24. (3 sc, dec) х6 (24)
25. (2 sc, dec) х6 (18)
26. (1 sc, dec) х6 (12)
Reduce to the end, cut the thread and leave the tip for sewing
Body
1. In orange, knit 6 sc into the amigurumi ring (6)
2. inc х 6 (12)
3. (1 sc, inc) х 6 (18)
4. (2 sc, inc) х 6 (24)
5. (3 sc, inc) х 6 (30)
6. (4 sc, inc) х 6 (36)
7. -10. Knit 4 Rows without change. Change the color to white in the last loop. You can cut the orange yarn. (36)
11. Knit another Row without change (36)
12. One Row unchanged, but behind the back of the loop. (36)
13.-14. We knit 2 more Rows without changes. (36)
14. 12 sc, dec х 6, 12 sc (30)
15. (3 sc, dec) х6 (24)
16.-18. We’re going to have three Rows unchanged. (24)
19. (2 sc, dec) х6 (18)
We fill our little body, cut the yarn and fix it
Now let’s return to the left loops of the 12th Row and knit the skirt according to the following pattern:
white (3 sc, inc) х6 (30)
three rows without change (30), in the last loop we change the color of the yarn to green.
(4 sc, inc) х6 (36)
two Rows unchanged (36) Cut off all the yarns, hide the ends.
Handles (2 times)
1. Orange in the amigurumi ring 6 sc (6)
2. inc х 6 (12)
3. (1 sc, inc) х 6 (18)
4. -5. Knit two rows without changes (18)
6. (4 sc, dec) х3 (15)
7. -9. Knit 3 Rows unchanged. (15)
10. (3 sc, dec) х3 (12)
11. -13. Knit 3 Rows unchanged. (12)
14. Fill in, decrease the loops to the end. Connect the second handle in the same way.
Legs (2 times)
1. Terracotta yarn connect into an amigurumi ring 6 sc (6)
2. inc х 6 (12)
3. (1 sc, inc) х 6 (18)
4. (2 sc, inc) х 6 (24)
5. Work one Row unchanged, but behind the back of the loop.(24)
6. We knit another Row without changes. In the last loop, change the color to orange (24)
7. -12. Work 6 Rows unchanged. (24)
13. (2 sc, dec) х6 (18)
14.- 15. Two Rows unchanged. (18)
We begin to fill in the detail.
16. (1 sc, dec) х6 (12)
17. One Row unchanged. (12)
18. dec х 6.
Pull off the loops, leave the tip for sewing. We knit the second leg in the same way.
Nose
1. Black in amigurumi ring to connect 7 sc, ch, turn (7)
2. One Row unchanged, ch, turn (7)
3. inc, 5 sc, inc (9)
Cut the yarn, leave the tip for sewing.
Ears (2 times)
1. Orange in the ring amigurumi connect 6 sc (6)
2. inc, 5 sc (7)
3. inc, 6 sc (8)
4. inc, 7 sc (9)
5. inc, 8 sc (10)
6. inc, 9 sc (11)
Cut the thread, leave the tip for sewing. Connect the second ear in the same way.
Tail
1. White in amigurumi ring connect 6 sc (6)
2. inc х6 (12)
3. One Row unchanged (12)
4. (1 sc, inc) х6 (18)
5. One Row unchanged(18)
6. (2 sc, inc) х6 (24)
7. One Row unchanged, changing the thread to orange in the last loop (24)
8. -14. Seven Rows unchanged (24)
15. (2 sc, dec) х6 (18)
16. -17. Two Rows unchanged (18)
18. (1 sc, dec) х6 (12)
Stuff in a little, fold both edges and knit 6 sc. Cut the yarn, leaving the tip for sewing.
Assembly and design
1. First, sew the head to the body. We fix the yarn, hide the ends.
2. Then we sew the handles. We place them symmetrically along the body. If everything suits you, we sew. We fix the thread, hide the ends.
3. Now we sew on the legs. We also arrange them symmetrically along the body. They should form a line with the arms.
4. We sew the nose and ears.
After sewing on all the details, the Chanterelle should look like this:
5. We start to make eyes.
Wool:
To do this, take a small piece of wool for felting, roll a ball out of it, and then flatten it into a pancake.
We put this pancake in place of our eye and start to roll. The size of the white of the eye will depend on which pupil you choose. The bee-bears have small eyes, so we will try to make them like that.
To get an even edge of proteins, you need to twist the wool into a thin bundle and weld it around the entire circumference. After our edges have leveled off, it remains only to glue the pupil or weld it from black wool.
From foamiran:
To do this, take a piece of white foamiran, draw two circles and attach the selected pupils. If everything suits you, we cut out the proteins, glue the pupils to them. Then we glue the eyes to the head, embroider eyebrows, a smile and eyelashes with a black thread.
That’s all! The chanterelle is ready! I will be very pleased if you mark me @katerina_gapeeva when publishing your work on the Internet.
Best regards

This is a free pattern for an easy amigurumi Mimi Teddy Bear. This teddy bear is perfect for beginners as it uses basic stitches and techniques. The pattern includes step-by-step instructions with pictures to guide you through the process. You will need some yarn, stuffing, and a crochet hook to make this adorable teddy bear. It’s a great project for a cozy and warm addition to your home decor or as a gift for a loved one. Download the pattern now and start creating your own cute and cuddly Mimi Teddy Bear today!


Comments0