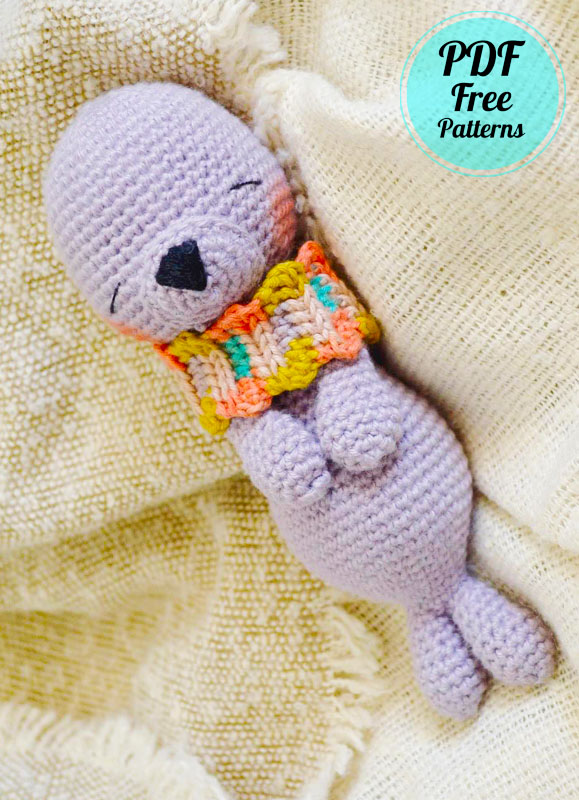
I shared a few more seal amigurumi patterns before. However, the seal amigurumi pattern that I will share today is quite easy and has great design differences. Especially the body structure of the seal amigurumi toy is quite narrow and has arms that are closed over the body. In addition, the tail of the seal has a very nice design. In addition to all this, a great snood was made.
Designer: crochet.by.stas
Materials
2.5mm crochet hook
Paintbox Cotton DK Elephant Grey
Ricorumi Print DK Rainbow Mix
Black embroidery thread
Darning needle
Stuffing
Abb.
St.= Stitch
Sl.st.= Slip stitch
Sc= Single crochet
Inc= Increase
Dec = Decrease
Dc= Double Crochet
If you are going to make the amigurumi toy using velvet yarn, you will have a look similar to the one below.

Head
1.MR 6 (6)
2.Inc x 6 (12)
3. Sc 1, Inc x 6 (18)
4. Sc 2, Inc x 6 (24)
5. Sc 3, Inc x 6 (30)
6. Sc 4, Inc x 6 (36)
7. Sc 5, Inc x 6 (42)
8-14. Sc around (42)
15. Sc 6, Inc x 6 (48)
16-18. Sc around (48)
19. Sc 6, Dec x 6 (42)
20. Sc 5, Dec x 6 (36)
21. Sc 4, Dec x 6 (30)
22. Sc 3, Dec x 6 (24)
23. Sc 2, Dec x 6 (18)
24. Sc 1, Dec x 6 (12)

Sl.St, cut and fasten off.
Stuff the head firm.

Snout
1. MR 6 (6)
2. Inc x 6 (12)
3. Sc 1, inc x 6 (18)
4. Sc 2, inc x 6 (24)
5. Sc around (24)

Sl.st., fasten off and cut.
No need to stuff the snout.

Fins x2
1. MR 4 (4)
2. Inc x 4 (8)
3. Sc 1, inc x 4 (12)
4-6. Sc around (12)
7. Sc 2, dec x 3(9)
8-9. Sc around (9)
Stuff the fin firm.
10. Sc 1, dec x 3 (6)

Only slst., cut and fasten off the 1st fin. For the 2nd, sc into the 1st fin to start the body.

Body
1. Join the fins by sc around both fins (12)
2. Sc around (12)
3. Sc 1, Inc x 6 (18)
4. Sc around (18)
5. Sc 2, Inc x 6 (24)
6. Sc around (24)
7. Sc 3, Inc x 6 (30)
8. Sc 4, Inc x 6 (36)
9. Sc 5, Inc x 6 (42)
10-15. Sc around (42)
16. Sc 5, Dec x 6 (36)
After round 16, put some stuffing near the tail (Rounds 1-4).

17. Sc 4, dec x 6 (30)
18-19. Sc around (30)
20. Sc 3, dec x 6 (24)
21-23. Sc around (24)
24. Sc 2, dec x 6 (18)
25-26. Sc around (18)
27. Sc 1, dec x 6 (12)
Stuff the rest of the body. Sl.st., fasten off and cut.

Arms
1. MR 6 (6)
2. Inc x 6 (12)
3-5. Sc around (12)
6. Sc 2, Dec x 6 (9)
7-12. Sc around (9)
13. Sc 1, Dec x 6 (6)
Slst., fasten off and cut.
No need to stuff the arms. Now, you can sew the body together and embroid the face!

Snood
1. Chain 8
2.Turn, sc 7 (7)
3-18. Turn, chain 2. Dc in third loop x 7 (7)
19. Turn, chain 1, sc x 6, sl.st (7)
Cut and fasten off.
Put the snood on.

Sew the ends together or sc 7 through both loops at each end until it’s closed.

That’s it! Amigurumi seal toy is ready!
Title: “Little Crochet Seal Amigurumi PDF Free Patterns”
Introducing our delightful collection of Little Crochet Seal Amigurumi PDF Free Patterns! These adorable and charming patterns are perfect for crafters of all skill levels, allowing you to create your very own crochet seal amigurumi.
Our patterns are easy-to-follow, with detailed instructions and step-by-step photos to guide you through the process. You’ll learn how to create the cute little seal’s body, flippers, and even its adorable face. The finished amigurumi will be a cherished addition to any child’s toy collection or a delightful decoration for your home.
Our free patterns offer a variety of sizes, from small enough to fit in the palm of your hand to larger versions that can be cuddled and played with. Choose from traditional colors or get creative and use bright, vibrant shades to make your seal stand out.
Not only is crocheting a relaxing and enjoyable hobby, but it also allows you to create unique and personalized gifts for loved ones. Plus, these little seals make wonderful teaching tools for children learning to crochet, as they provide a manageable project with instant gratification.
So why wait? Start exploring our Little Crochet Seal Amigurumi PDF Free Patterns today and embark on a fun and rewarding crafting journey. Create memories, share your creations with others, and enjoy the satisfaction of making something beautiful with your own hands. Happy crocheting!


Comments0