
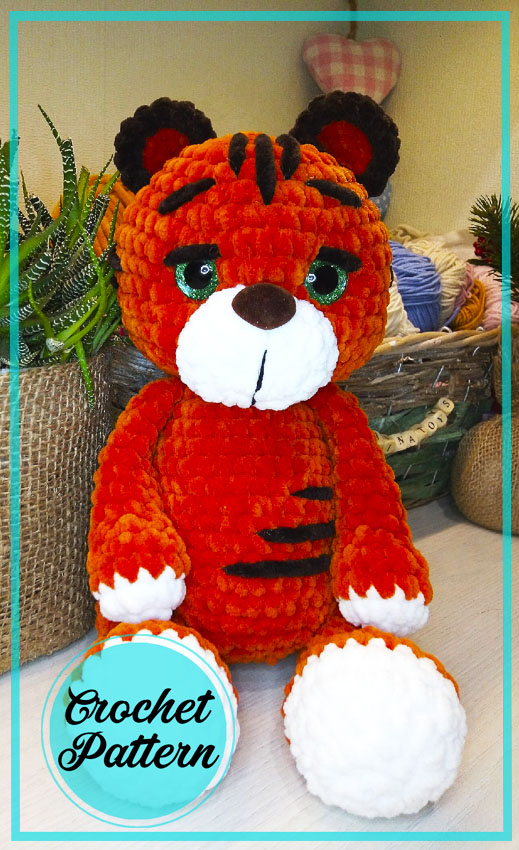
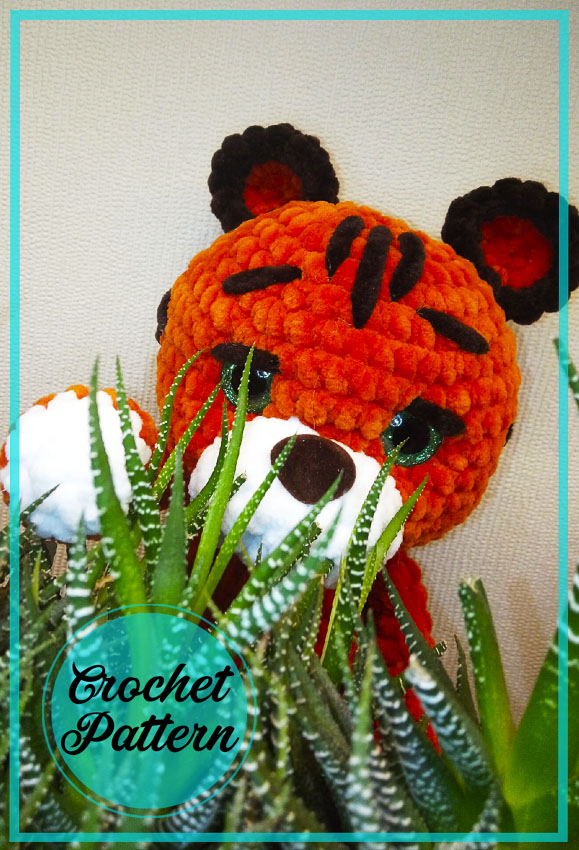
Friends, today I accelerated my tiger patterns sharing. Because I think there is too much demand. If you wish, you can examine other categories for tiger amigurumi patterns. Today’s pattern is made in a tone close to the color of brick. Actually, I think these kinds of colors are a better choice. In addition, I think it is a much more correct decision for the lines of the crocheted tiger to be asymmetrical. Of course, this is determined by the imagination of the designer. In addition, the nose and mouth parts are usually well designed. Here is an example of that. Now let’s make crochet tiger amigurumi together.
Hello dear fiends. Today we will knit awesome tiger amigurumi. It’s free amigurumi tiger crochet pattern.
Author: Kalabina Alena
(my instagram @kalabina_toys, https://vk.com/alenakalabina)
Free master class
Necessary materials:
1. Yarn art Dolce yarn color pumpkin 778, or Himalaya Dolphin baby 80368 (consumption 85 gr),
white color Yarn art Dolce 741 (consumption 17g), chocolate Himalaya Dolphin baby 80343 (consumption 5g)
2. Glitter eyes 16mm green
3. Chipboard discs 30 mm and cotter pins 25 * 2mm
4. Velvet nose 16 mm (glue at the end with super glue)
5. Crochet hook 3.5 mm (knit tight enough)
6. Long needle with a large eye for embroidery
Abbreviations
AR – Amigurumi Magic ring
MR – Amigurumi Magic ring
App – application
ll – lift loop
sc : Single Crochet
inc : Increase
dec : Decrease
tr : Triple Crochet/ Treble Crochet
st: Stitch
dc : Double Crochet
hdc: Half Double Crochet
sl-st : Slip Stitch
ch : Chain
..in : make increase into same stitch as many as the number which is given in front of “inc” abbreviation (exp; 3inc, 4inc..).
FLO : Crochet into front loops only
BLO : Crochet into back loops only
BL : Bobble Stitch – do 5dc all in the same stitch and then yarn over and pull through all the loops on your hook (the original loop + 1 loop for each partially completed dc).
Lower legs (2 parts)
1. Knit in white 3 ch +1 lifting loop
2.1 sc in second loop from hook, 1sc, 3sc in last loop, 1 sc, inc, slst.
3. inc,1sc,3 inc,1sc,2 inc, slst.
4. inc,3sc,inc,1sc,inc,1sc,inc,2sc,inc,1sc,inc,slst.
5. 19 sc, change to main color
6. 19 sc
7. 4 sc,4 dec,7 sc (15) (decreases strictly in the middle)
8. 5 sc,1 dec,8 sc (14)
Next, we knit 7 rows, fill the leg (not much up)
Between 12 and 13 next we insert a disc with a cotter pin B next. in a row we make decreases in 1 sc, pull off the hole with a needle.
Who does not make a cotter pin, after the 15th row, you can fold in half and knit 6 sc (we will sew the paws to the body)
Hands (2 parts)
1. 6 in MR white
2. 6 inc (12) change color
3. 12 sc
4. 2 dec (10)
8 rows without inc, fold in half, 4 sc, leave thread to sew on
Ears (2 parts)
1. 6 in MR
2. 6 inc (12) ,cut the thread
3. Knit in dark color – 12 sc, leave thread for sewing
Head
1.6 sc in MR
2. 6 inc (12)
3. 1 sc, inc* 6 time (18)
4. 2 sc,inc*6 time (24)
5. 3 sc,inc*6 time (30)
6. 4 sc,inc*6 time (36)
7. 5 sc,inc*6 time (42)
8. 6 sc,inc*6 time (48)
4 rows without inc (48)
We insert eyes on the plug m / y 9 and 10 next Between the eyes 5 sc (I heat the plug with a lighter)
13. 6 sc,dec*6 time (42)
14. 5 sc,dec*6 time (36)
15. 4 sc,dec*6 time (30)
16. 3 sc,dec*6 time (24)
17. 2 sc,dec*6 time (18)
1 row without dec (this is the neck)
19. 2 sc,inc*6 time (24)
20. 3 sc,inc*6 time (30)
8 rows without inc and dec
29. 4 sc,inc*6 time (36)
1 row without incovok
In the next row, insert the lower legs on the Splint mount
How to insert split pins there is a video on my Instagram page
31. 4 sc,dec*6 time (30)
32. 3 sc,dec*6 time (24)
33. 2 sc,dec*6 time (18)
34. 1 sc,dec*6 time (12)
35.decreases up to 6 sc, pull the thread
Nose
1. White 3 ch, sc in 2nd loop from hook, in last loop 3 sc, on reverse side 1 sc, 2 sc, slst.
2.increase in each loop
3.wave in 1 sc
4.19 sc, leave thread for sewing
Tail
1. White 6 in MR
2.6 sc, change color
11 rows without inc, fold in half, 3 sc, leave thread to sew on
We embroider the eyebrows, stripes along the body with a dark color
How to make an eye-lift
https://disk.yandex.ru/d/CsGNhw4rVaMiSA?uid=49645038

Title: “Crafting Cuteness: A Free Crochet Pattern for a Lovely PlusTitle: “Crafting Cuteness: A Free Crochet Pattern for a Lovely Plush Tiger Amigurumi”
Introducing our latest free crochet pattern, perfect for all amigurumi enthusiasts! This pattern guides you through the process of creating a delightful plush tiger, designed to bring joy and charm to any space. With detailed instructions and step-by-step photos, even beginners can easily create this lovely creature. Let your creativity shine and make a soft, huggable friend that will be cherished for years to come. Download now and embark on a fun and rewarding crochet journey!


Comments0