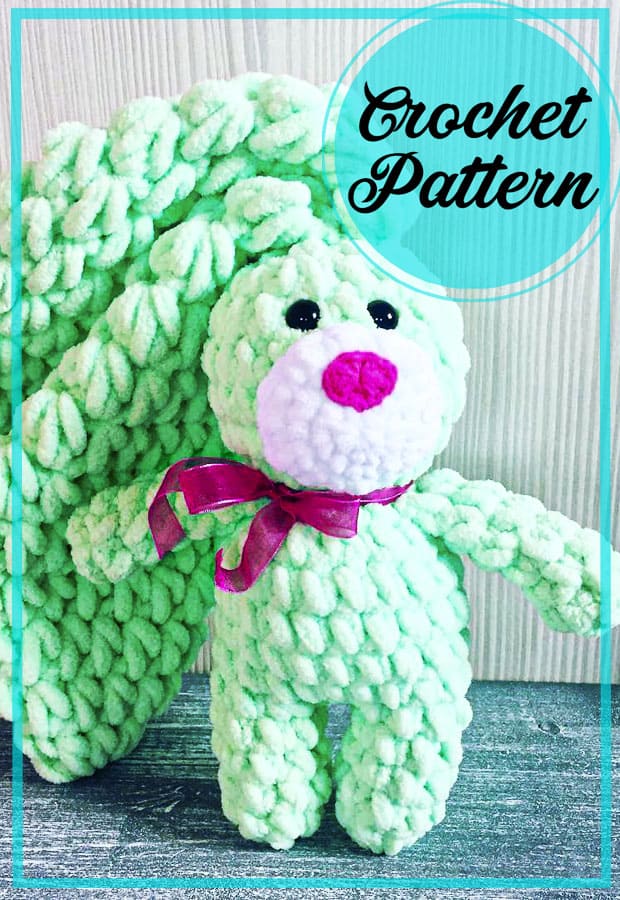
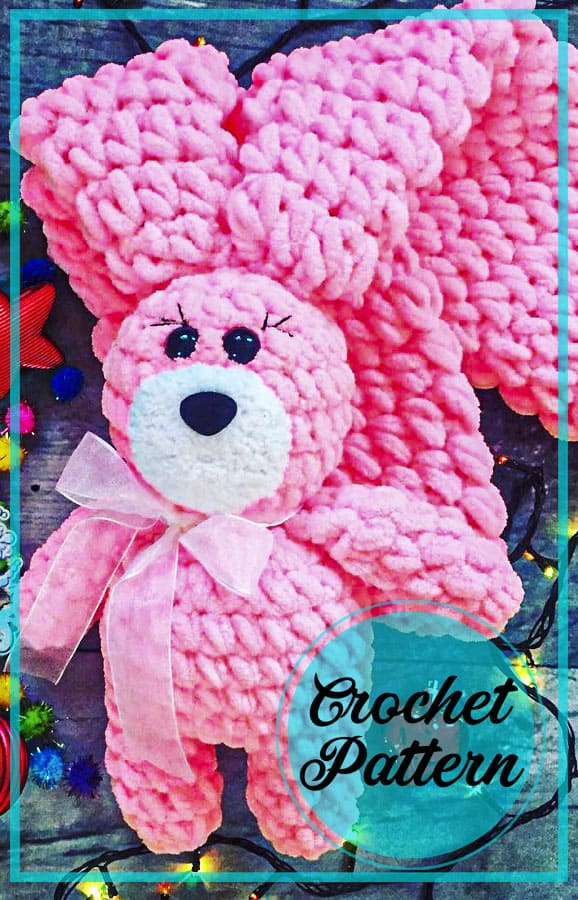
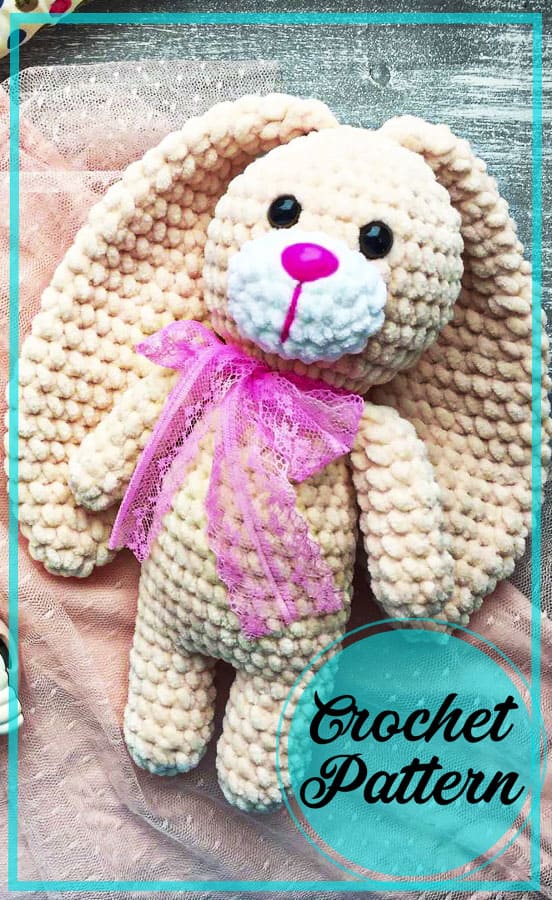
Friends, I am with you with an excellent bunny amigurumi pattern. How are you today? I am actually very tired today, I was not thinking about entering content, but after finding this amigurumi pattern, everything changed. One of the most beautiful amigurumis I’ve seen lately.
I know that I have shared too many bunny amigurumi patterns. But there are really beautiful models. This amigurumi pattern is one of them. Thank you very much to @plus_toys_poly who prepared this pattern. I suggest you follow the Instagram page.
She have very valuable shares. So what’s in this bunny pattern? The most important criterion for me is that it is plush. I really like plush amigurumis. I also liked the fact that his ears were large. Big-eared bunny are very remarkable.
45cm tall with ears. After completing, you can knit the dress if you want. I have shared a few models in this way as an example for you. I hope you will like it.
I will be very happy if you share your pictures with me after completing the amigurumi. May it be easy for all of you.
Necessary materials:
Adelia Dolly yarn (2 skeins)
Some white yarn for the muzzle (Softy or Dolce) and pink for the nose
Hook number 9 (8 or 10, depends on the density with which you knit, and for the ears, you can take the hook even more so that the ears are looser and softer)
2 black eye beads
Sewing needle with large eye
Strong thread for sewing Rows
Satin ribbon or organza
Holofiber for stuffing toys
Abbreviations
sc : Single Crochet
inc : Increase
dec : Decrease
tr : Triple Crochet/ Treble Crochet
st: Stitch
dc : Double Crochet
hdc: Half Double Crochet
sl-st : Slip Stitch
ch : Chain
..in : make increase into same stitch as many as the number which is given in front of “inc” abbreviation (exp; 3inc, 4inc..).
FLO : Crochet into front loops only
BLO : Crochet into back loops only
BL : Bobble Stitch – do 5dc all in the same stitch and then yarn over and pull through all the loops on your hook (the original loop + 1 loop for each partially completed dc).


Legs
We knit the first leg:
1 Row: 6 sc in MR or 2 ch and in the 2nd loop from the hook (6)
2 Row: (inc, 2 sc)*2 times (8)
3-5 Row: 8 sc (3 Rows )
Tighten the loop and cut the thread.
We knit the second leg in the same way as the first with Row 1-5, without breaking the thread, we continue knitting:
Body
6 Row: 4 sc along the same leg, then 8 sc along the first leg and another 4 sc along the working leg – this way we put both legs together (16)
Stuff the legs with holofiber.
7 Row: then we knit in a circle in a spiral and make 2 dec in Rows – either on the sides of the bunny, or in the middle of the belly and back – at your discretion (14)
8 Row: again 2 dec in Row (12)
9 Row: 2 dec in row (10)
10 Row: 2 dec in row(8)
Наbeat the torso with holofiber.
11 Row: 1 dec (7)
We knitted the legs and torso, then we begin to knit the head:
Head
12 Row: 7 inc (14)
13 Row: (inc, 1 sc)*7 time (21)
14 Row: (inc, 2 sc)*7 time (28)
15 Row: (dec, 2 sc)*7 time (21)
16 Row: (dec, 1 sc)*7 time (14)
17 Row: 7 dec (7)
We fill our head with holofiber.
We tighten the loop, cut off the thread, leaving the tail 10 cm long, pull the tail over the front wall of all 7 loops and tighten the hole, tighten the loop again, hide the yarn tail in the product.
Hands (2 time.)
1 Row: 6 sc in MR (6)
2 Row: (inc, 2 sc)*2 times (8)
3 Row: 8 sc
4 Row: (dec, 2 sc)*2 times (6)
We tighten the loop, cut the thread.
Since the yarn in a skein is only 40 m, in order to save yarn, the details can be sewn with some strong thread to match the main yarn. If you do not save yarn, then at the handles, ears and tail you need to leave the end of the thread 15-20 cm long for sewing the details to the body.
Tail
1 Row: 6 sc in MR, connect the 6th sc to the 1st with a connecting loop.
Ears (2 time.)
1 Row: 6 sc in MR (6)
2 Row: (inc, 2 sc)*2 time (8)
3 Row: 1 sc, inc, 3 sc, inc, 2 sc (10)
4 Row: 2 sc, inc, 4 sc, inc, 2 sc (12)
5 Row: 3 sc, inc, 5 sc, inc, 2 sc (14)
6 Row: 4 sc, inc, 6sc, inc, 2 sc (16)
7 Row: 16 sc (16)
8 Row: 4 sc, dec, 6 sc, dec, 2 sc (14)
9 Row: 3 sc, dec, 5 sc, dec, 2 sc (12)
10 Row: 2 sc, dec, 4 sc, dec, 2 sc (10)
11 Row: 1 sc, dec, 3 sc, dec, 2 sc (8)
12 Row: dec, 2 sc, dec, 2 sc (6)
We tighten the loop, cut the thread.
You don’t need to fill your ears with filler!
For a muzzle made of white yarn, we knit an oval or a circle, as you like.
The nose can be glued with a plastic one or attached with a plug-in (which has a leg and a seal for fixing from the inside out), you can knit a circle of pink (or other color) yarn, or you can simply embroider, another option is to cut a circle out of felt and sew on.
Assembling the toy
We fill the handles with filler and sew to the body, sew on the tail, ears.
We attach the nose to the muzzle, sew the muzzle to the head.
We sew on eyes-buttons, or you can cut a circle out of dark felt and sew instead of eyes.
We tie a satin ribbon around the neck.
The bunny is ready!
If it is necessary to knit a larger bunny, then it is necessary to change the number of loops on the legs – thereby the body will be wider and longer (since it will take longer to decrease), the head can be knitted on 8-9 loops. On the ears, make increases up to 8-9 Row, and make decreases through Row. Thus, the bunny can be increased in size, but then 3 skeins will be required.
When publishing your toys related to this description, please indicate the author.
This is a free crochet pattern for making a plush bunny with big, floppy ears. The amigurumi technique is used to create a soft and cuddly toy that is perfect for children or as an adorable decoration. The pattern includes step-by-step instructions and detailed diagrams to guide you through the process. You will need basic crochet skills and some yarn in your preferred color to complete this project. With a little patience and effort, you can create a charming bunny that will be loved by all who see it.


Comments0