Friends I know, Christmas hasn’t arrived yet. However, let’s share the amigurumi patterns about christmas already. It’s not that easy to do. Someone who does it for the hobby can finish it in as little as 15 days.
First of all, I am thinking of sharing a lot of Christmas-related content this year. I will share them whenever I have the opportunity. The first is a great reindeer. First, Ирина Белоусова, who prepared this amigurumi. She is a Russian friend. The last time I looked at, the instagram profile was closed.
However, it will open a new one. She has great shares. I suggest you follow her. If we come to the reindeer amigurumi, a very detailed model friends. I’m sure you will love it. The designer, even thought of the hangers of the pants :).
I also liked the facial expression very much. It looks quite natural. It is very difficult to create such expressions in amigurumi. I will share the yarn and necessary materials with you in the pdf section of the subject. You can save it from your computer or phone.
Good luck to you all. I will be very happy if you share the amigurumi with me after completing it.
1.Yarn.
When knitting, I used YarnArt Jeans.
Colors: N 71 – brown, N 28 – graphite,
N 01 – white, N 74 – pink, N 72 – purple,
N 73 – peach.
2.Hook
3. Filling – holofiber
4. Eye beads with a diameter of 0,31 inch
5.Nose 0,39 inch.
6. Basting needles
7.Stitching needle
8.Scissors (2 pcs, diameter 0,24 inch)
Abbreviations
sc : Single Crochet
inc : Increase
dec : Decrease
tr : Triple Crochet/ Treble Crochet
st: Stitch
dc : Double Crochet
hdc: Half Double Crochet
sl-st : Slip Stitch
ch : Chain
..in : make increase into same stitch as many as the number which is given in front of “inc” abbreviation (exp; 3inc, 4inc..).
FLO : Crochet into front loops only
BLO : Crochet into back loops only
BL : Bobble Stitch – do 5dc all in the same stitch and then yarn over and pull through all the loops on your hook (the original loop + 1 loop for each partially completed dc).
1.Head
1.) 6 sc in AR (6)
2.) 6 inc (12)
3.) (1 sc , inc)*6 (18)
4.) 1 sc, inc, (2 sc, inc)*5, 1 sc (24)
5.) (3 sc, inc)*6 (30)
6.) 2 sc, inc, (4 sc, inc)*5, 2 sc (36)
7.) (5 sc, inc)*6 (42)
8.) 3 sc, inc, (6 sc, inc)*5, 3 sc (48)
9.) (7 sc, inc)*6 (54)
10.) – 18) 54 (54, 9 rows)
19.) (7 sc, dec)*6 (48)
20.) 3 сsc, dec, (6 sc, dec)*5, 3 sc (42)
21.) (5 sc, dec)*6 (36)
22.) 2 sc, dec, (4 sc, dec)*5, 2 sc (30)
23.) 3 sc, dec (24)
24.) 1 sc, dec, (2 sc, dec)*5, 1 sc (18)
25.) (1 sc, dec)*6 (12)
Next, we knit 2 dec, tighten the hole, fix the thread, cut it off.
2.The ears
Knit 2 pieces of pink yarn (N 74),
2 details – brown (N 71):
1.) 6 sc in AR (6)
2.) 6 inc, sl st (12)
According to this scheme, we knit 4 parts, fix the thread and cut from each part.
Fold the pink part and the brown with the wrong sides to each other, the pink part to ourselves. We bind with brown yarn (1 ch, 10 sc.), fix the thread, cut it off.
3.Muzzle
Knit with white yarn (N 01)
1.) 6 sc in AR (6)
2.) 6 inc (12)
3.) 12 sc (12)
We fix the thread, cut it off.
4.Head patch
Yarn of peach color (N 73) we gain 3 ch.
1.)From the second from the loop hook we knit 2 sc, ll,
the turn (2)
2.) 2 sc, ll, the turn (2)
3.) 2 inc, ll, the turn (4)
4.) 4 sc, ll, the turn (4)
5.) 1 sc, inc, 2 sc, ll, the turn (5)
6.) 5 sc, ll, the turn (5)
7.) 1 sc, inc, 1 sc, inc, 1 sc, ll, the turn (7)
8.) 7 sc (7)
We tie the part along the edge of the sl st.
We fix the thread, cut it off.
5.Cheeks
Color N 74
1.) 6 sc in AR, sl st (6)
We fix the thread, cut it off.
6.Right leg
We start knitting with graphite color (N 28)
1.) 6 sc in AR (6)
2.) 6 inc (12)
3.) (1 sc, inc)*6 (18)
4.) 1 sc,inc, (2 sc, inc)*5, 1 sc (24)
5.) (3 sc, inc)*6 (30)
6.) 30 sc scbl (30)
7.) – 8.) 30 sc (30, 2 rows)
9.) 11 sc, dec, dec, dec, dec, 11 sc (26)
10.) 10 sc, deс of three loops, deс of three loops, 10 sc (22)
11.) 5 sc, dec, 3 sc, deс of three loops, 4 sc, dec, 3 sc (18)
Change the color to pink (N 74)
12.) 13 sc, inc, 4 sc (19)
13.) 14 sc, inc, 4 sc (20)
14.) 20 sc (20)
Change the color to purple (N 72)
15.) 15 sc, inc, 4 sc (21)
16.) 16 sc, inc, 4 sc (22)
17.) 17 sc, inc, 4 sc (23)
18.) 18 sc, inc, 4 sc (24)
19.) 24 sc (24)
We knit another 7 sc, fix the thread, cut it off.
7. Left foot
We start knitting with graphite color (N 28)
1.) 6 sc in AR (6)
2.) 6 inc (12)
3.) (1 sc, inc)*6 (18)
4.) 1 sc,inc, (2 sc, inc)*5, 1 sc (24)
5.) (3 sc, inc)*6 (30)
6.) 30 sc scbl (30)
7.) – 8.) 30 sc (30, 2 rows)
9.) 11 sc, dec, dec, dec, dec, 11 sc (26)
10.) 10 sc, deс of three loops, deс of three loops, 10 sc
(22)
11.) 5 sc, dec, 3 sc, deс of three loops, 4 sc, dec, 3 sc (18)
Change the color to pink (N 74)
12.) 4 sc, inc, 13 sc (19)
13.) 4 sc, inc, 14 sc (20)
14.) 20 sc (20)
Change the color to purple (N 72)
15.) 4 sc, inc, 15 sc (21)
16.) 5 sc, inc, 15 sc (22)
17.) 6 sc, inc, 15 sc (23)
18.) 7 sc, inc, 15 sc (24)
19.) 24 sc (24)
We knit another 23 sc, do not cut the thread, continue to knit:
24 sc on the right leg,
24 sc on the left,
24 sc on the right.
We put a marker (we mark the beginning of a row).
8.Body
20.) 11 sc, inc, 11 sc, inc, 11 sc, inc, 11 sc, inc (52)
21.) – 28.) 52 sc (52, 8 rows)
Change the color to pink (N 74)
29.) 11 sc, dec, 11 sc, dec, 11 sc, dec, 11 sc, dec (48)
30.) – 31.) 48 sc (48, 2 rows)
32.) 12 sc, dec, 24 sc, dec, 8 sc (46)
33.) 46 sc (46)
34.) 1 sc, dec, 21 sc, dec, 20 sc (44)
35.) 12 sc, dec, 20 sc, dec, 8 sc (42)
36.) 2 sc, dec, 18 sc, dec, 18 sc (40)
37.) 12 sc, dec, 18 sc, dec, 6 sc (38)
38.) 2 sc, dec, 16 s, decc, 16 sc (36)
39.) 2 sc, dec, (4 sc, dec) *5, 2 sc (30)
40.) 30 sc (30)
41.) (3 sc, dec)*6 (24)
42.) 24 sc (24)
43.) 7 sc, dec, 10 sc, dec, 3 sc (22)
44.) 22 sc, sl st (22)
We fix the thread, cut it off
9. Hands
We knit 2 parts.
We start to knit with brown yarn (N 71):
1.) 6 sc in AR (6)
2.) 6 inc (12)
3.) – 5.) 12 sc (12, 3 rows)
Change the color to pink (N 74)
6.) – 22.) 12 sc (12, 17 rows)
Knit an additional 4 sc, fold the part in half, knit together 6 sc
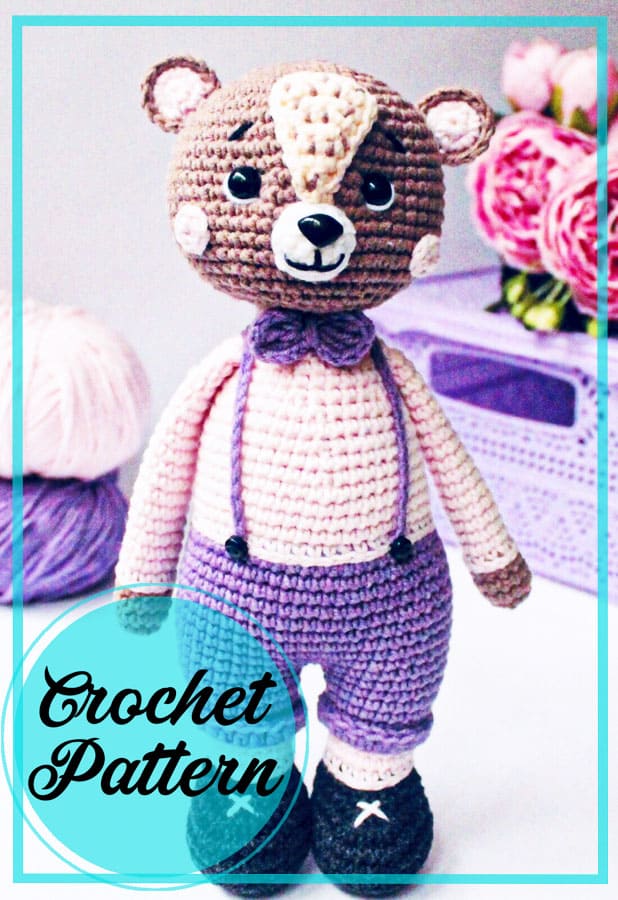
All design photos are presented below the text.
1.) We position the muzzle from the 15th to 18th row of the head. Fill not tight, sew.
2.) Glue the nose.
3.) Glue the eyes on the 13-14 rows of the head, the distance between them is 8 sc.
4.) We make eye tightening, draw the lower eyelid with white thread.
5.) Sew on the ears. Because we knit in a spiral, then we place them in the middle of the head on the same level. from 9 to 11 row – on the one hand, from 8 to 10 – on the other.
6.) Embroider a smile with black thread. We insert the needle into AR, then in the photo.
7.) On the head patch with brown yarn, randomly embroider spots. Sew the patch along the contour to the head, place between the eyes from the muzzle up.
8.) We sew the cheeks from the 16th to the 18th row. At a distance of 5 sc. from the muzzle.
9.) We embroider the eyebrows with black yarn between 9 and 10, 10 and 11 rows. Eyebrow length = 2 sb. Arranged above the eyes.
The design of the head is completed. Now proceed to the assembly.
10.) Sew the head to the body. As you sew, we fill the neck so that the head does not dangle.
11.) Sew handles between 3 and 4 rows of the body
12.) We knit the cuffs (2 parts): 20 ch, lock the connecting loop in the ring, 2 ll, 19 hdc, the sl st, cut the thread. Sew on the 15th and 16th rows of legs.
13.) Laces embroider cross to cross with white yarn between 9 and 10, 10 and 11 rows.
14.) We knit the straps for the pants (2 parts): 30 ch. Sew on the front on buttons at a distance of 10 sc., 6 sc – on the back. We fix the shoulder straps so that they do not slip


Comments0