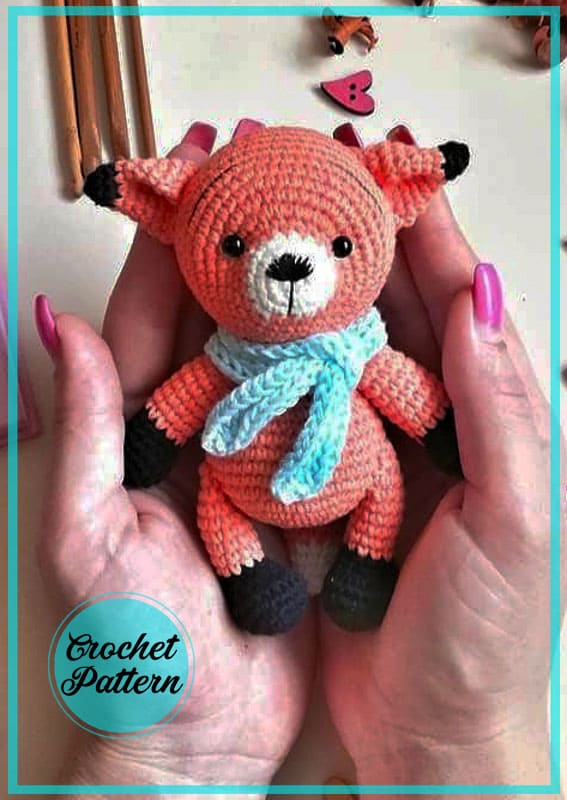
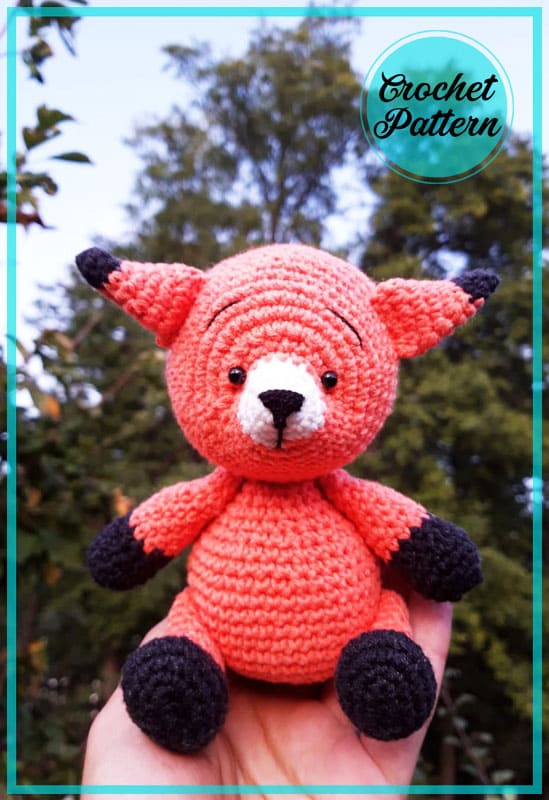
Today I am sharing a very cute fox amigurumi pattern. This cute crochet fox’s name is Richie. Crochet fox patterns are often difficult. It usually consists of 3 colors. Red white and black. You can use orange instead of red. The nose part is usually the hardest part of crocheted fox amigurumi. However, this pattern is somewhat detailed on the ears. Especially the design of the ears. Also, follow the step by step pattern while making the head. You don’t need to crochet your eyes. It’s so cute that the tips of his arms and feet are black. Now let’s crochet the fox amigurumi step by step.
Designer: igrushki_kids.krd
Materials:
– Yarn “ALIZE” ANGORA GOLD
(100gr / 550m) (20% wool / 80% a krill)
– Orange – 30g
– White – 10g
– Black – 10g
– Hook number 1
– Half-bead eyes
– Glue
– holofiber
– Needle, scissors
– Yarns Iris black
Abbreviations
AR – Amigurumi Magic ring
LL: Lifting loop Click for mean!
MR – Amigurumi Magic ring
App – application
sc : Single Crochet
inc : Increase
dec : Decrease
tr : Triple Crochet/ Treble Crochet
st: Stitch
dc : Double Crochet
hdc: Half Double Crochet
sl-st : Slip Stitch
ch : Chain
..in : make increase into same stitch as many as the number which is given in front of “inc” abbreviation (exp; 3inc, 4inc..).
FLO : Crochet into front loops only
BLO : Crochet into back loops only
BL : Bobble Stitch – do 5dc all in the same stitch and then yarn over and pull through all the loops on your hook (the original loop + 1 loop for each partially completed dc)
Tips:
– You can knit with any yarn of your choice, this will only affect the size of the toy
– We knit a toy in a spiral, unless otherwise indicated
– Decreases fit invisible
– I advise you to knit with a yarn tension
– We stuff the toy in the process of knitting
– The size of the finished toy from the specified materials is 11cm, from the yarn of jeans from Yartarn 15cm.
Head:
1Rnd: White yarn 6sc in MR
2Rnd: inc*6 – 12sc
3Rnd: (3sc,inc)*3times – 15sc
4Rnd: (4sc,inc)*3times – 18sc
5Rnd: Change the yarn to orange (5sc,inc)*3times -21sc
6Rnd: (6sc,inc)*3times – 24sc
7Rnd: 6sc,12inc,6sc- 36sc
8Rnd: 36 sc
9Rnd: (5sc,inc)*6times -42sc
10Rnd: (6sc,inc)*6times – 48sc
11-19Rnd: 48sc (9rnds)
20р:(6sc,dec)*6times – 42sc
21р:(5sc,dec)*6times – 36sc
22р:(4sc,dec)*6times – 30sc
23р:(3sc,dec)*6times – 24sc
24р:(2sc,dec)*6times – 18sc
25р:(1sc,dec)*6times – 12sc
26р:(dec)*6times.
Close knitting, pull off the loops.
This is the head you should get!
Ears 2 parts:
1Rnd: Black yarn 6sc in MR
2Rnd: (1sc,inc)*3times – 9sc
3Rnd: 9sc
Change the yarn to orange
4Rnd: (2sc,inc)*3times – 12sc
5Rnd: (3sc,inc)*3times – 15sc
6Rnd: (4sc,inc)*3times – 18sc
7Rnd: (5sc,inc)*3times – 21sc
8Rnd: (6sc,inc)*3times – 24sc
Fold the piece in half and knit. Fasten and cut the yarn, leaving a long end for sewing.
Fold the eyes as in the photo and secure.
Head design:
Mark the eyelet tightening points with pins. Between the 6th and 7th rows, in the 7th row we put a pin after the first increase and, having retreated one column down, we put the second pin.
Between the pins for tie-downs 8sc
Make a tightening and glue the eyes
Sew on the ears from 11 to 13 rows. Between the ears 11- 12sc
Sew the nose and eyebrows with black yarn.
Here we have such a cute face)
Body:
1Rnd: Orange yarn 6sc in MR
2Rnd: inc*6times – 12sc
3Rnd: (1sc,inc)*6times – 18sc
4Rnd: (2sc,inc)*6times – 24sc
5Rnd: (3sc,inc)*6times – 30sc
6Rnd: (4sc,inc)*6times – 36sc
7Rnd: (5sc,inc)*6times – 42sc
8-13Rnd: 42sc (6rnds)
14Rnd: 7sc,(dec,3sc)*5times,dec,8sc-36sc
15-16Rnd: 36sc
17Rnd: 7sc,(dec,2sc)*5times,dec,7sc-30sc
18Rnd: (3sc,dec)*6times – 24sc
19Rnd: 24sc
20Rnd: (2sc,dec)*6times – 18sc
21Rnd: 18sc,slst.
Paws:
1Rnd: Black yarn 6sc in MR
2Rnd: inc*6times – 12sc
3Rnd: (3sc,inc)*3times – 15sc
4-5Rnd: 15sc
6Rnd: 2dec,11sc-13sc
7Rnd: dec,11sc-12sc
Change the yarn to orange
8-15Rnd: 12sc (8rnds)
16Rnd: dec*6times
Close the knitting, fasten the yarn and leave the long end for sewing.
* We fill only the lower part of the hands
Tail:
1Rnd: White yarn 6sc in MR
2Rnd: 3inc,3sc-9sc
3Rnd: 9sc
4Rnd: Change to orange
2sc,3inc,4sc-12sc
5Rnd: 12sc
6Rnd: (3sc,inc)*3times – 15sc
7-10Rnd: 15sc (4rnds)
11Rnd: (3sc,dec)*3times – 12sc
12Rnd: 12sc
13Rnd: (2sc,dec)*3times – 9sc
Fold the piece in half and knit on both sides. Cut the yarn, leaving the long end to be sewn on.
Legs:
1Rnd: With black yarn, pick 5ch from 2 loops from the inc hook, 2sc, 3inc at the top, 3sc on the back of the chain -10sc
2Rnd: 2inc,2sc,3inc,2sc,inc-16
3Rnd: (1sc,inc)*2times,2sc,(1sc,inc)*3times,3sc,inc-22sc
4-5Rnd: 22sc (knit another 2-3 sc for offset)
6Rnd: 5sc,6dec,5sc-16sc
7Rnd: 6sc,2dec,6sc-14sc
8Rnd: (4sc,dec)*2times,2sc-12sc
9-15Rnd: 12sc (7rnds)
16Rnd: dec*6times
We fill only the lower part!
Close the knitting, fasten the yarn and leave the long end for sewing.
Assembly:
Sew your head to body
Sew on the ponytail between 6-7 rows
Sew on the legs in the area of the 9th row
Sew the handles under the head
Tie a fox scarf, any pattern that you like
* I have a scarf knitted with a false English elastic pattern
Congratulations, your adorable little fox Richie is ready! Thanks for knitting with me!
Richie the Fox is a delightful amigurumi pattern that you can easily create using a PDF crochet pattern. This adorable fox is perfect for any occasion, whether it’s as a cuddly toy for a child or a decorative item for your home. The pattern is easy to follow and suitable for beginners, making it an excellent project for anyone looking to try their hand at amigurumi. With its charming design and soft texture, Richie the Fox is sure to become a beloved addition to your collection. So why not get started on this fun and rewarding project today?


Comments0