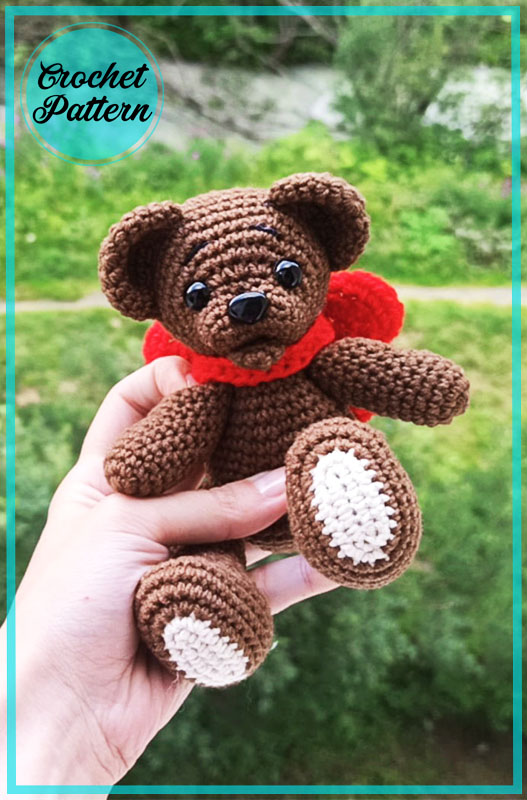
Dear friends. Today we will crochet a very cute teddy bear amigurumi pattern with you. A very cute and small teddy bear amigurumi. I suggest you pay attention to color transitions. Buttons are used on the nose and eyes of the Amigurumi teddy bear. So it is a little easier to make. The arms of the teddy bear amigurumi are also quite simple. The only place that can force you is the legs of the amigurumi. In general, it is a very simple teddy bear amigurumi. It is very easy to work with crochet. I can recommend it for beginners. Now let’s crochet the teddy bear amigurumi step by step.
Designer: stefis
LIST OF MATERIALS REQUIRED:
1. Yarn of a suitable color (brown) I used YarnArt Jeans, crochet hook # 2.5. Red yarn (for a bow) or a red ribbon. Some black yarn (for eyebrows and nose).
Some beige yarn (for heels).
2. Hook of a suitable size (I have a number 2.5).
3. A piece of a wide red ribbon (for a bow).
4. Filler
5. Black half-beads (8 mm), small plastic spout (you can embroider)
Auxiliary tools: scissors, needle, thread, eye glue.
Abbreviations
AR – Amigurumi Magic ring
MR – Amigurumi Magic ring
App – application
ll – lift loop
sc : Single Crochet
inc : Increase
dec : Decrease
tr : Triple Crochet/ Treble Crochet
st: Stitch
dc : Double Crochet
hdc: Half Double Crochet
sl-st : Slip Stitch
ch : Chain
..in : make increase into same stitch as many as the number which is given in front of “inc” abbreviation (exp; 3inc, 4inc..).
FLO : Crochet into front loops only
BLO : Crochet into back loops only
BL : Bobble Stitch – do 5dc all in the same stitch and then yarn over and pull through all the loops on your hook (the original loop + 1 loop for each partially completed dc).
Muzzle-head (one piece)
1 Rnd: we put on a chain of 7 ch, crochet from the second loop from the hook: 5 sc, in the last loop we crochet 3 sc, crochet along the other side of the chain: 4 sc, inc (14)
2 Rnd: inc, 4 sc, 2 inc, 6 sc, inc (18)
3-4 Rnd: 18 sc (18) – 2 rnd
5 Rnd: sc, 6 inc, 11 sc (24)
6 Rnd: sc, (sc, inc) х 6 time, 11 sc (30)
7 Rnd: (4 sc, inc) х 6 time (36)
8 Rnd: (5 sc, inc) х 6 time (42)
9-14 Rnd: 42 sc (42) – 6 rounds
15 Rnd: (5 sc, dec) х 6 time (36)
16 Rnd: (4 sc, dec) х 6 time (30)
17 Rnd: (sc, dec) х 10 time (20)
18 Rnd: (sc, dec) х 6 time, 2 sc (14)
Add some filler to the head.
19 Rnd: dec.in each r. (7)
Pull the hole, hide the thread.
Body
Brown:
1 Rnd: 6 sc in MR (6)
2 Rnd: inc. in every row (12)
3 Rnd: (sc, inc) х 6 time (18)
4 Rnd: (2 sc, inc) х 6 time (24)
5 Rnd: (3 sc, inc) х 6 time (30)
6 Rnd: (4 sc, inc) х 6 time (36)
7-11 Rnd: 36 sc (36) – 5 rounds
12 Rnd: (4 sc, dec) х 6 time (30)
13-16 Rnd: 30 sc (30) – 4 rnd
17 Rnd: (3 sc, dec) х 6 time (24)
18 Rnd: 24 sc (24)
19 Rnd: (2 sc, dec) х 6 time (18)
20 Rnd: 18 sc (18)
Add filler. We leave the thread for sewing on the head. Sew on the head.
We crochet Arms (2 parts)
1 Rnd: 7 sc in MR (7)
2 Rnd: inc. in each row (14)
3-6 Rnd: 14 sc (14) – 4 rnd
7 Rnd: 5 sc, 2 dec, 5 sc (12)
8-15 Rnd: 12 sc (12) – 8 rounds.
Add filler.
16 Rnd: (2 sc, dec) х 3 times (9)
17 Rnd: (sc, dec) х 3 times (6)
Pull the hole, hide the thread. We crochet the second handle in the same way.
We crochet legs (2 parts)
Beige:
1 Rnd: 7 ch, from the 2nd loop from the hook, crochet 5 sc along the chain, 3 sc in the last loop, then crochet along the other side of the chain: 4 sc, increase (14)
2 Rnd: inc., 4 sc, 3 increments, 4 sc, 2 increments (20)
Change the thread to brown:
3 Rnd: inc., 6 sc, 5 inc, 5 sc, 3 inc (29)
4 Rnd: 10 sc, 6 inc, 11 sc, inc, sc (36)
5-6 Rnd: 36 sc (36) – 2 rnd
7 Rnd: 10 sc, 6 dec, 14 sc (30)
8 Rnd: 7 sc, 6 dec, 11 sc (24)
9 Rnd: 24 sc (24)
10 Rnd: (2 sc, dec) х 6 time (18)
11 Rnd: 18 sc (18)
Add filler.
12 Rnd: (sc, dec) х 6 time (12)
13-21 Rnd: 12 sc (12) – 9 rounds
22 Rnd: dec. in every r. (6)
Add filler.
Pull off the hole. We crochet the second leg in the same way. Sew on the legs and hands (I made them on a thread mount so that they were movable).
We crochet a mouth (optional)
Brown:
1 Rnd: 6 sc in MR (6)
2 Rnd: (sc, inc) х 3 times (9)
3 Rnd: 9 sc (9)
We leave the thread for sewing.
Sew on the head, make the muzzle tighten, sew on the mouth (optional).
Ears (2 parts)
Brown:
1 Rnd: 9 sc in MR (9)
2 Rnd: inc. in each r. (18)
3 Rnd: (2 sc, inc) х 6 time (24)
4-6 Rnd: 24 sc (24) – 3 rnd
We crochet the second ear in the same way.
We sew the ears to the head.
Sew on handles and legs.
Tail
Brown:
1 Rnd: 6 sc in MR (6)
2 Rnd: inc.in each r. (12)
3 Rnd: 12 sc (12)
4 Rnd: (2 sc, dec) х 3 times (9)
Add some filler, sew on the ponytail. We glue the eyes and nose, embroider the eyebrows.
This is a free crochet pattern for an adorable Teddy Bear with a scarf. The pattern is available in PDF format and is suitable for beginners as well as experienced crocheters. The Teddy Bear is made using the amigurumi technique, which involves creating a stuffed toy by crocheting small squares and joining them together. The scarf can be customized to match your desired color scheme or style. This pattern is perfect for creating a cuddly and warm Teddy Bear that will be loved by all ages. It makes a great gift for children or adults and can be used as a decorative item in your home. So, grab your crochet hook and yarn and get ready to create this cute Teddy Bear with a scarf!


Comments0