Hello friends.
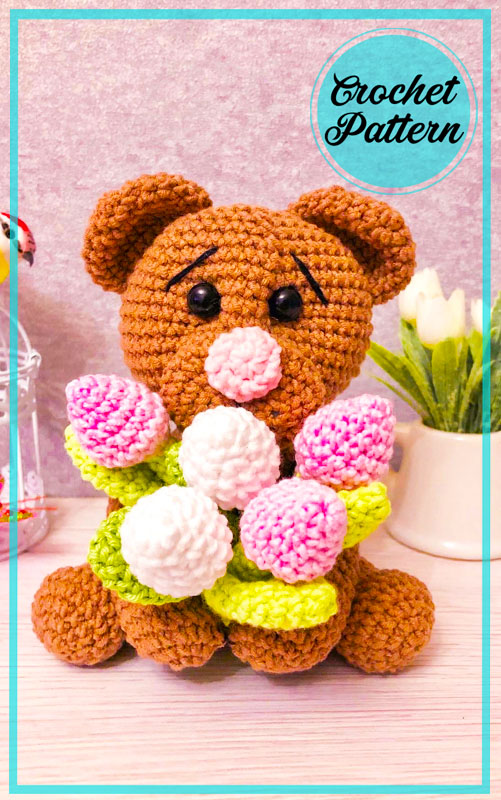
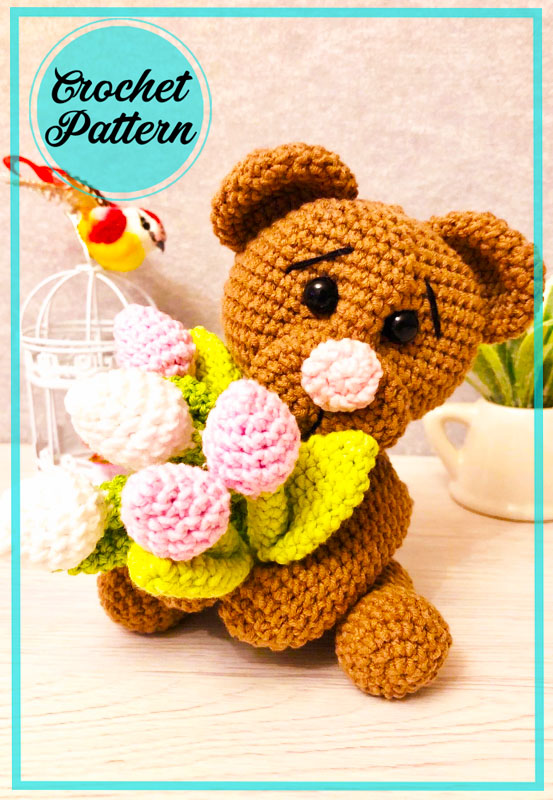
Are you ready to knit a cute teddy bear with tulips in its arms? Today I am sharing a very cute teddy bear pattern.
Dear friends. It can be a very right choice to start embroidering with amigurumi crochet with teddy bear patterns. As you know, bear amigurumi patterns are quite plentiful. You can find many videos and explanations on this topic. We are trying to share lots of amigurumi teddy bear patterns. There are many variations on teddy bear amigurumi patterns. You can find most of them on our website. I explain step by step how the patterns are crocheted.
In terms of color, teddy bears are usually crocheted using brown color. However, there are amigurumis that you can choose in different colors. You can find different colors and models in the teddy bear amigurumi category. Now let’s crochet this cute teddy bear amigurumi step by step.
Materials (edit)
1.Yarn (semi-cotton 270-330m / 100gr). I have YarnArt jeans. The main color is 35-40g, quite a bit green and yarn of the color of the nose and tulips. Black iris for face embroidery.
2. Any filler (synthetic fluff, holofiber).
3.Fastening for the head. Eyes D = 10mm. Hook 2mm, needle.
Designer: nina_sukhina
Abbreviations
AR – Amigurumi Magic ring
MR – Amigurumi Magic ring
App – application
ll – lift loop
sc : Single Crochet
inc : Increase
dec : Decrease
tr : Triple Crochet/ Treble Crochet
st: Stitch
dc : Double Crochet
hdc: Half Double Crochet
sl-st : Slip Stitch
ch : Chain
..in : make increase into same stitch as many as the number which is given in front of “inc” abbreviation (exp; 3inc, 4inc..).
FLO : Crochet into front loops only
BLO : Crochet into back loops only
BL : Bobble Stitch – do 5dc all in the same stitch and then yarn over and pull through all the loops on your hook (the original loop + 1 loop for each partially completed dc).


Torso:
1р- 6 sc in MR (6)
2р-(inc)*6times(12)
3р-(1sc,inc)*6times(18)
4р-(2sc,inc)*6times(24)
5р-(3sc,inc)*6times(30)
6р-(4sc,inc)*6times(36)
7р-(5sc,inc)*6times(42)
8р-(6sc,inc)*6times(48)
9р-13р- 48sc(48)
14р-(dec,6sc)*6times(42)
15р-(dec,5sc)*6times(36)
16р-(dec,4sc)*6times(30)
17р-30sc(30), starting to fill
18р-(dec,3sc)*6times(24)
19р-24sc(24)
20р-(dec,2sc)*6times(18)
21р-(dec,1sc)*6times(12) insert the mount
22р-(dec)*6times(6),slst, We pull the loops together.
Head:
1р- 6 sc in MR (6)
2р-(inc)*6times(12)
3р-(1sc,inc)*6times(18)
4р-(2sc,inc)*6times(24)
5р-(3sc,inc)*6times(30)
6р-(4sc,inc)*6times(36)
7р-(5sc,inc)*6times(42)
8р-(6sc,inc)*6times(48)
9р-(7sc,inc)*6times(54)
10р-16р-54sc(54)
17р-(dec,7sc)*6times(48)
18р-(dec,6sc)*6times(42)
We attach the head to the body
19р-(dec,5sc)*6times(36)
20р-(dec,4sc)*6times(30)
We fix the eyes between 14-15 P, the distance between the eyes is 6sc.
We begin to fill.
21р-(dec,3sc)*6times(24)
22р-(dec,2sc)*6times(18)
23р-(dec,1sc)*6times(12)
24р-(dec)*6times(6),slst, pull the loops.
Lower legs:
1р- 6 sc in MR (6)
2р-(inc)*6times(12)
3р-(1sc,inc)*6times(18)
4р-(2sc,inc)*6times(24)
5р-6р-24sc(24)
7р-(dec)*6times,12sc(18)
8-13р-18sc(18)
We begin to fill
14р-(dec,1sc)*6times(12)
15р-12sc(12)
16р-(dec)*6 times(6),slst.
Upper feet:
1р- 6 sc in MR (6)
2р-(inc)*6times(12)
3р-(1sc,inc)*6times(18)
4р-5р-18sc(18)
6р-(dec)*4times,10sc(14)
7р-17р-14sc(14)
We fill.
8р-(dec)*7times(7),slst.
Muzzle:
1р-6ch (6)
2р- insert the hook into the second loop from the hook and knit 3sc out of it, then along the 3sc chain, then from one loop 3sc, 3sc(12)
3р-(inc)*3times,3sc,(inc)*3times,3sc (18)
4р-(1sc,inc)*3times,3sc,(1sc,inc)*3times,3sc (24)
5р-(2sc,inc)*3times,3sc,(2sc,inc)*3times,3sc (30)
6р-7р-30sc(30)
8р-(dec,3sc)*6times(24)
9р-(dec,2sc)*6times(18)
We fill up quite a bit.
10р-(dec)*9times(9),slst.
Ears:
1р- 6 sc in MR (6)
2р-(inc)*6times(12)
3р-(1sc,inc)*6times(18)
4р-(2sc,inc)*6times(24)
5р-7р-24sc(24),slst.
Nose:
(tulip color)
1р- 6 sc in MR (6)
2р-(inc)*6times(12)
3р-12sc(12)
4р-(dec)*6times(6),slst.
tulip:
Let’s start with a leaf.
leaf:
1р- 6 sc in MR (6)
2р-6sc(6)
3р-(inc)*6times(12)
4р-10р-12sc(12),slst, cut the thread.
Bud stem
We start with a bud:
1р- 6 sc in MR (6)
2р-6sc(6)
3р-(inc)*6times(12)
4р-12sc(12)
5р-(1sc,inc)*6times(18)
6р-18sc(18)
7р-(dec,1sc)*6times(12)
We fill.
8р-(dec)*6times(6),change the color to green
9р-14р-6sc(6)
15р-take the leaf, fold it in half, insert the hook through two loops of the leaf, into the loop of the stem and knit sc, and so on until the end. (6sc)
16р-22р-6sc(6),slst.
Assembly:
With the help of a needle, we make a tightening: we insert the needle into the lower inner part of the eye, withdraw it in the lower inner part of the other, tighten it. And so several times.
Next, we sew a muzzle, a nose to it. Fold the ears in half, sew. We embroider eyebrows and a muzzle.
Sew on the upper legs, sew together. Sew on the bottom.
This is a crochet pattern for an adorable Teddy Bear with Tulips. The pattern includes step-by-step instructions and detailed photos to guide you through the process. It is suitable for beginners and intermediate crocheters. The Teddy Bear is made using basic crochet stitches such as single crochet, double crochet, and slip stitch. The tulips are made using a combination of chain stitches and slip stitches. The pattern also includes instructions on how to add the tulips to the Teddy Bear. This pattern is perfect for creating a unique and personalized gift for a loved one or for adding a touch of spring to your home decor.

Comments0