
Friends, today I will share a very cute plush bunny amigurumi pattern. First of all, I must say that the pattern is completely free. A bunny amigurumi pattern made using gray velvet thread. I haven’t shared crochet bunny patterns for a long time. In fact, I have to say that I took a break from sharing for a long time. However, I continue my amigurumi pattern sharing from where I left off and I will continue to share with great speed. Keep following me. Rabbit patterns can often be designed simply. However, I have to say that you will have some difficulty in making this bunny amigurumi. Because amigurumi is not designed flat. There are big differences between the layers. This results in a more difficult design. But if you’re a good designer, you don’t have to worry.
Designer: skazka_iz_klubochka
What you need for crocheting:
Yarn:
Himalaya Dolphin Fine Gray Yarn
Hook 2.5-2.75
Filler
Needle for stitching parts
Eyes 10 mm
Spout 10 mm
The size of the specified yarn is 24 cm.
Abbreviations
AR – Amigurumi Magic ring
LL: Lifting loop Click for mean!
MR – Amigurumi Magic ring
3in1 – crochet 3 columns in one loop
sc : Single Crochet
inc : Increase
dec : Decrease
tr : Triple Crochet/ Treble Crochet
st: Stitch
dc : Double Crochet
hdc: Half Double Crochet
sl-st : Slip Stitch
ch : Chain
..in : make increase into same stitch as many as the number which is given in front of “inc” abbreviation (exp; 3inc, 4inc..).
FLO : Crochet into front loops only
BLO : Crochet into back loops only
BL : Bobble Stitch – do 5dc all in the same stitch and then yarn over and pull through all the loops on your hook (the original loop + 1 loop for each partially completed dc)

Head
1. 6 sc in MR
2. inc *6 (12)
3. (1 sc, inc) *6 (18)
4.1 sc, inc, (2 sc, inc)*5, 1 sc (24)
5. (3 sc, inc)*6 (30)
6. 2 sc, inc, (4 sc, inc)*5,2 sc (36)
7. (5 sc, inc)*6 (42)
8-13. 42 sc (6 rows)
14. 12 sc, (2 sc, inc)*3, put an additional marker, (inc, 2 sc)*3, 12 sc(48)
15-16. 48 sc
If you have eyes on the caps, then put them at 11-12 loop, the distance between them is 6 sc.
Where you put the marker – put the nose.
17. 3 sc, dec, (6 sc, dec)*5, 3 sc (42)
18. (5 sc, dec)*6 (36)
19. 2 sc, dec, (4 sc, dec)*5, 2 sc (30)
20. (3 sc, dec)*6 (24)
21. 1 sc, dec, (2 sc, dec)*5,1 sc (18)
Fasten the yarn, cut it Well we fill the head, especially the cheek area.

Legs (2 pcs)
We stuff our legs like this: the foot is tight, the middle of the leg is only slightly, and the top of the leg is not stuffed at all.
1. 7 sc in MR
2. inc *7 (14)
3. (1 sc, inc) *6 (21)
4. (2 sc, inc)*6 (28)
5. (3 sc, inc)*6 (35)
6-7. 35 sc
8. 12 sc, dec*5, 13 sc (30)
9. 9 sc, dec*6, 9 sc (24)
10. (2 sc, dec)*6 (18)
11-20. 18 sc (10 rows)
Work 2 sc more, fold leg in half and work 8 sc across two sides. Fasten and cut the yarn (or leave a long end of the yarn if you later sew on, not crochet)

Hands (2 pcs)
We stuff our hands in the same way as a leg – the handle is tight, the middle is slightly, the top is not stuffed
1. 6 sc in MR
2. inc *6 (12)
3. (1 sc, inc) *6 (18)
4. (2 sc, inc)*6 (24)
5-6. 24 sc (2 rows)
7. (6 sc, dec)*3 (21)
8. (5 sc, dec)*3 (18)
9. (4 sc, dec)*3 (15)
10-19. 15 sc (10 rows)
Fold handle in half and work through two walls 7 sc. Fasten and cut the yarn (or leave the long end of the yarn if you will later sew on, not crochet).

Body
The marker will run down the center of the backrest.
Make an offset loop periodically.
We stuff the body as we crochet
1. 6 sc in MR
2. inc *6 (12)
3. (1 sc, inc) *6 (18)
4.1 sc, inc, (2 sc, inc)*5, 1 sc (24)
5. (3 sc, inc)*6 (30)
6. 2 sc, inc, (4 sc, inc)*5, 2 sc (36)
7. (5 sc, inc)*6 (42)
8. 3 sc, inc, (6 sc, inc)*5, 3 sc (48)
9. (7 sc, inc)*6 (54)
10. 10 sc, 8 sc we crochet together with the leg, 18 sc, 8 sc with a second leg, 10 sc. If you do not crochet the legs, then crochet without change 54 sc.
11-14. 54 sc (4 rows)
15. (7 sc, dec)*6 (48)
16. 48 sc
17. 3 sc, dec, (6 sc, dec)*5, 3 sc (42)
18. 42 sc
19. (5 sc, dec)*6 (36)
20. 36 sc
21. 2 sc, dec, (4 sc, dec)*5, 2 sc (30)
22. 30 sc
23. (3 sc, dec)*6 (24)
See if there is a marker in the middle of the backrest, align if necessary.
24.3 sc, 7 sc together with the hand, 5 sc, 7 sc with the other hand, 2 sc (24)
25. 1 sc, dec, (2 sc, dec)*5,1 sc (18)
26. 18 sc
Fasten the yarn. Leave a long yarn for sewing.

Ears
We crochet in rotary rows. We end each row with a ch, I do not indicate it in the diagram.
1. 3 вп, from the 2nd loop
2. inc*2
3. 4 sc
4. inc, 2 sc, inc (6)
5. 6 sc
6. inc, 4 sc, inc (8)
7. 8 sc
8. inc, 6 sc, inc (10)
9-28. 10 sc (20 rows) – for convenience, I mark with a marker every 5 rows
29. dec, 6 sc, dec (8)
30. 8 sc
31. dec, 4 sc, dec (6)
32. 6 sc
We make ch and tie the ear sc. At the very bottom of the ear, where there are 2 loops, we make 2 sc in 1 loop.
We fasten and cut the yarn, leaving a long end for sewing.
Tail
1. 6 sc in MR
2. inc *6 (12)
3. (1 sc, inc) *6 (18)
4. (2 sc, inc)*6 (24)
5-6. 24 sc (2 rows)
7. 8 sc, 4 dec, 8 sc (20)
8. (3 sc, dec)*4
We fasten and cut the yarn, leaving a long end for sewing.

Assembly
We sew the head to the body. In order for it to stand evenly, pin it with pins to the body.
We make a peephole tightening. A cotton or semi-cotton yarn is well suited for tightening. Insert the needle at point 1, leaving the end of the yarn. Then we enter and withdraw according to the scheme: 1-3-4-2. We pull up the strings and re-enter at point 1 and proceed to the second eye: 1-5-6-2. We tighten the yarns well. We tie the yarns together and hide the excess in the head.
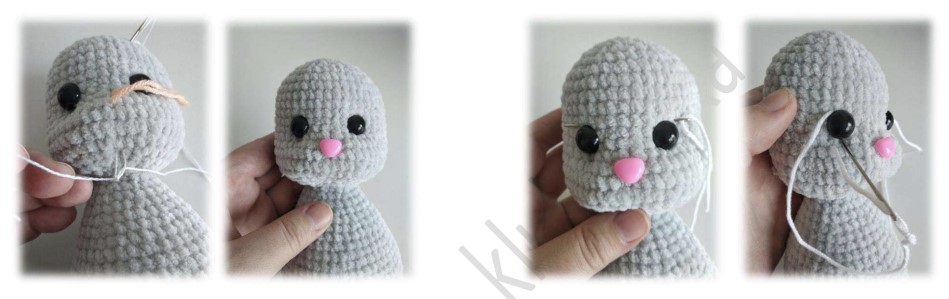
Next, we embroider the eyes. We embroider the whites of the eye with a white yarn. And we embroider the eyelids and eyebrows in black (see photo below)
We embroider the nose at our discretion. I sewed with horizontal lines from one point to another, carefully aligning the yarns.
Sew on the ears on the 5-6th row of the head. You can experiment and sew the ears slightly lower or slightly higher, closer or further.

If the arms and legs are not tied, then we sew them too. Handles on the 24th row, you can even sew them a little obliquely. Legs – 10 row. Make sure the arms and legs are symmetrical to each other!
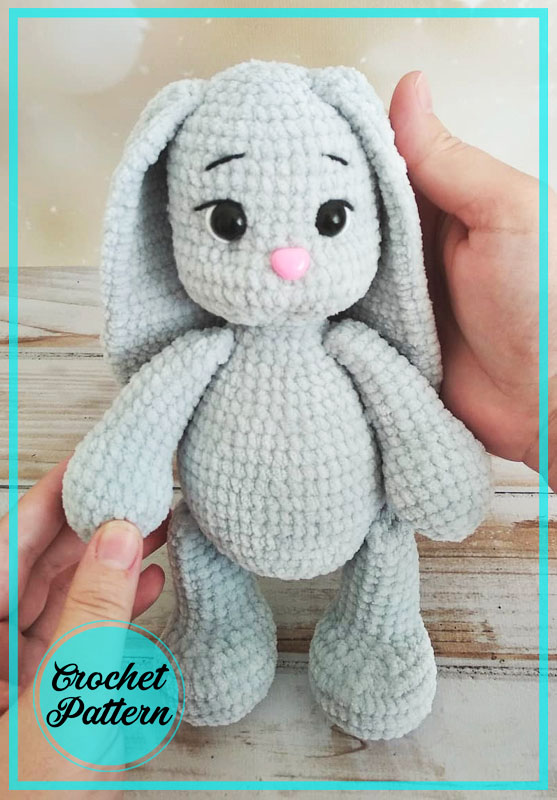
This is a free crochet pattern for a plush bunny amigurumi in PDF format. Amigurumi is a Japanese art of knitting or crocheting small, stuffed animals using yarn. This pattern is perfect for beginners who want to learn how to make a cute and cuddly bunny. The pattern includes step-by-step instructions with photos and diagrams to guide you through the process. You will need basic crochet skills and some yarn to complete this project. The finished bunny measures about 6 inches tall and is made with soft, washable yarn. It’s a great project for gift-giving or just for fun. Download the PDF pattern now and start creating your own adorable bunny amigurumi today!

Comments0